First thing’s first: prototyping is a ton of fun, but having fun won’t pay the bills. It’s not uncommon for prototyping to become a stuttering back and forth that wastes tons of time and money. We scrap and start over, because we imagine that a fresh start is all we need. Some refactoring, a new fancy algorithm, then things will be amazing.
I want to get to the bottom of prototyping, since it’s absolutely essential for any systemic development and contains a whole bunch of tough considerations. It’s also something I personally love doing and often lose time in.
This article sums up some takeaways I’ve made from analysing a career’s worth of prototyping and thinking about why and how more critically. I will be using some real life examples from a mix of hobby development and studio work, and from the work of people who are much better than I am.
What’s the Point?
Before you spend any time prototyping, you need to consider why you are making your prototype to begin with. We’ll get to the reasons why in a moment.
But first, there are two cases where prototypes are rarely the answer at all:
Making a prototype because you enjoy making it. The “what if?” style of prototype. Accept that this type of prototype is hobby development and that it’s unlikely to see the light of day without serious scope considerations. This is perfectly fine! It’s probably 90% of the prototyping I’ve done personally and I enjoy it for what it is. Some prototypes have turned into commercial ideas years later, but as prototypes on their own they were rarely viable.
The best part of building “what if?” prototypes is that you get better at the crafts involved. You get good at finishing prototypes, which in itself is an important skill. You will also expand your toolbox with every solution you come up with. But you have to separate prototyping you do because you like it from prototyping you do to pay the bills: the latter needs to be better structured (and motivated), so that your time isn’t wasted.
Making a prototype because a potential partner tells you to make one. Some of you have been there. You speak to a potential stakeholder—maybe a publisher or investor—and they say, “this sounds cool, but can you show us a prototype?”
“Of course!” you say and then immediately jump to your computer. “We’ll get back to you in a month!” Maybe you ramp up your team, or you work long hours to make this newly introduced prototype a reality. It can sometimes include vague demands from the potential stakeholder, sometimes not. It’s much too easy to turn this into a pleaser rather than something that benefits your project. Something you do more as a reaction to the stakeholder’s demands than as a solution to real-world problems.
The thing is: many stakeholders will never say no. They will instead ask you to fulfil some new criteria with every criteria you fulfil. Once you deliver the prototype they asked for, they’ll ask for an added feature, an additional level, higher quality art, or something else. This can push you into an evil cycle (that you pay for!) where you are working from an implied promise that will never materialise. This gets particularly bad if you are only working one lead and against the clock. This stakeholder has then put you on a leash of promises with very limited substance, and there is a very real risk that your prototyping is simply lots of wasted effort that you only cling to because of the sunk cost.
Of course, it’s impossible to know when you are being strung along and when there is genuine interest behind a request. Some humility is required. But since this prototyping is on your dime, it’s generally smart to assume that you’re being strung along and at the very least seek additional stakeholders in the meantime.
You may also ask for financing to deliver the prototype. Just don’t hold your breath.
It’s sometimes the same when you pitch games.
Exploring Ideas
In an ideal world, the work of a game designer can be divided into six stages. After the Commitment stage, you should be done prototyping and get busy implementing and polishing. But before then, prototyping is amazing.
In the Ideation stage, you use prototypes as a means to try out what you’re talking about. It’s much easier to talk about something playable than it is to discuss game design theory. Mostly because subjectivity means everyone will be right and no one will be wrong—a prototype gives us something concrete to talk about. We can start liking or disliking something on its own merits and not just play game reference tennis against each other. I.e., keep referring to other games until someone doesn’t know the reference, and lose because they “dropped the ball.”
In the Exploration stage, you take it one step further, and you figure out which of your ideas are valid and which can be scrapped. You will also often come up with new material for ideation. This Exploration-stage prototyping is what we usually refer to when we talk about prototyping—that “what if?” thing. But there’s a world of difference between the “what if?” you ask while pitching or enjoying some fun dev time, and the “what if?” you ask after beginning paid development. You’re exploring ideas in concrete form and should stick firmly to the ideas that yield real results.
Finally, in the Commitment stage, you prototype to figure out what stays and what goes, and to illustrate to your coworkers what game you are actually making. It’s a prototype of the product, often known as a “proof of concept,” and no longer just happy developer funtime.
Finding Your Sweet Spot
Derek Yu, the maker of Spelunky, wrote a classic blog post about finishing your games. This article is amazing and should be read in its entirety. But the point I will steal from it is the idea of finding your sweet spot. The convergence between games you want to make, games you want to have made, and games you’re good at making.
Prototyping can help you find this sweet spot. This can be rough, since figuring out what you are good at will require you to first try things you suck at. But prototyping so you more easily can identify what you should be doing with your time is definitely worth some time and effort.
Personally, I’ve often bounced off 3D modeling and level design, because they are crafts I’m simply not very good at. I sometimes dabble in it anyway because I have to, but generally, any concepts relying heavily on art and level design fall outside of my “games I’m good at making” bubble. This is something I’ve found out through prototyping.

Making Your Pitch Sexy
In the words of Chris Hecker, “You have to hold a gun to people’s heads to get them to review or read a design doc. Prototypes sell themselves.” (Emphasis mine.)
Basically, when you pitch something—whether to your team internally or to someone external—a prototype will give you something to present that’s not just Powerpoint slides with fancy transition animations. Today, prototypes have become a requirement when you pitch things. If you can’t demo your game using a prototype in some state, it’s a lot harder to get stakeholder attention and you’re likely to be requested to make a prototype anyway (see “Making a prototype because a potential partner tells you to make one,” earlier).
So even if you still do this because it makes your pitch sexier, that sexiness has become a requirement since Hecker made his GDC presentation (in 2006). You rarely have a choice anymore.
Proving Feasibility
Prototyping to demonstrate that something is possible at all is often a throwaway type of prototyping, but it’s still important. Whether you are demonstrating to your team that your engine of choice has certain capabilities or that you can make your game run on a new target platform with different specs, or even just trying some compelling new procedural algorithm, it allows you to move forward with less speculation.
This type of focus, where you are prototyping individual pieces of technology or pipeline rather than games, can easily create a form of tunnel vision. You don’t see the game for the systems, more or less. It also requires a high degree of technical literacy from everyone involved, including external stakeholders. The reason is simple: if you are working primarily on tech, and you need to constantly explain the things you work on, this repeated explanation will eat into the development time that tech needs. I suspect this is one of the reasons that many large teams tend towards safer and less technical game designs: they don’t have the resources to keep explaining things to product owners who don’t understand the technologies involved.
The biggest danger with this type of prototyping is that many programmers, myself included, enjoy the process of building systems and technology more than actually wrapping things up or turning them into product. Whether something fits with the bigger picture is sometimes lost along the way.
Finding Viability
Eric Reis’ excellent book The Lean Startup brings a more product-oriented perspective on prototyping called a Minimum Viable Product or MVP. The important distinction between an MVP and any old prototype is in the word product (the second time it’s bold-faced in this article).
“Unlike a prototype or concept test,” writes Eric Reis, “an MVP is designed not just to answer product design or technical questions. Its goal is to test fundamental business hypotheses.”
The process involved can be summarized as Build-Measure-Learn. You build the smallest possible functional product that potential consumers could interact with, even purchase, then you measure concrete metrics in its behavior. Finally, you take what you learned and you circle back to Build.
Many game developers I know claim that they build MVPs, then make technical prototypes or games with half-baked or non-existent parts. A “true” MVP would mean cutting those parts out entirely and building something that represents the smallest possible representation of the finished game. Or a part of the finished game that you need to test, for example the game’s retention loop.
In essence, a MVP is more like the initial launch you might do in Early Access than it is a traditional game development prototype.

Prototyping Methods
So there are many good reasons to make prototypes. There are also many different ways to go about actually building them. Here are some methods you can consider with your prototyping—as long as you don’t lose sight of the “why.”
Getting Shit Done
It might just be that none of the reasons to build prototypes sound convincing enough to you. Why would you ever waste time throwing away stuff you spent resources building? If it gets built, it should get used.
This seems to have been the ruling mentality of early-day id Software, as exemplified by John Romero in an interview with The Tim Ferriss Show:
“We would build this functionality, because that was the original design, and if we found out that that functionality actually is a detriment to the game itself or the soul of the game, then we’ll remove it. But it wasn’t like we’re prototyping, no, we’re making that piece of technology in the game. It was going to be part of the game.”
John Romero
In this method, you’re not prototyping at all, you’re simply working off the task list or design specification that describes your game. Only in rare cases will you cut something out. This requires that you have good communication in your team, that you know what you are doing, and that you can scope things accurately.
This method means you don’t prototype at all. You set out to finish your game as planned.
Béchamel Method
One of the things my kids enjoy is lasagna. When made properly, you use a béchamel sauce. You can easily burn this sauce, make it too thin or too thick. It takes some patience and practice to get it right. What you can do to make the potential béchamel problem more predictable is that you make it in advance. You begin by tackling the biggest challenge first.
This same strategy works wonders in prototyping. By going straight to building the toughest, least known, or most challenging feature of your game, and demonstrating that it works, you’re making your game’s béchamel in advance.
Imagine making a first-person shooter. The shooting, movement, level design fundamentals etc, can all be considered self-evident features, at least if you have made first-person shooters before. You know how they’ll work and you have a rough picture of how to make them. But that procedural spell-combination system you want to add on top of it is something you haven’t seen before, and it therefore presents a long list of unknowns.
With this method, you prototype this specific thing first, with the goal of finding good solutions to how to make it work before you move forward with the rest of your game.

Foundation-First Method
The complete opposite of the béchamel method is to start with the foundation for your game. In the example used previously, you’d focus on prototyping the shooting and movement for your first-person shooter. Once that’s all in place you’d potentially move on to the spell combination stuff. But in case your time or money has already run out, you’ll still have something foundational to deliver.
If you know that a major draw of your game will be its content rather than the functionality you are offering, this is a great method. For games that are highly narrative or cinematic, or where you hope to have many different levels, enemy variations, etc., constructing this foundation gives you something to lean back on if your more experimental prototyping doesn’t work out.
For extremely short projects and projects that are delivered as work for hire, this is probably the most common method of all. It’s designing by reference or design by committee as method.

Core Method
So you can start with the most risky thing to build or the most fundamental. Another variant is to start with the most iconic part of your game and build this as your prototype. It will probably cut across multiple systems and may require some more resources to finish, but it’s an excellent way to demonstrate that your newfangled feature can hold its own.
This was referred to as a “Core X Playable” at Electronic Arts for some time—maybe still is. In those days, Dead Space‘s dismemberment-based combat was an example of a Core X feature and had been demonstrated in prototype form.
The best part of doing this is that it forces you to figure out what makes your game different from other similar games in the first place. This can be particularly relevant for games attempting to present new Intellectual Property (IP) or that are built on specific gimmicks.
What’s more, you can often effectively separate the core prototype from your main game development. Maybe (like in the Assassin’s Creed example below) you even deploy a different engine from the one the game will be made in.

Pipeline Method
Without good tools and processes, we can’t make games. Simple as that. In Tor Frick’s amazing talk, Building the World of The Ascent, he goes through some of the many clever techniques that allowed a small team to punch high above its weight. These types of tools and processes can define a project just as much as its gameplay or art direction.
Starting from developer workflow demonstrations and tools is another angle into prototyping. If you know that you want to build a large open world, many varied levels, or interesting combat encounters, your prototyping can serve to define the pipelines used to produce this content rather than the playable game. It’s a way both to make your game stand out and to address scoping and scaling issues that potential partners may have with your project.
This can be a risky thing to do, since you need to really blow people’s minds to have them care too much about a pipeline or tool. It also requires that the people you show it to understand the value of what you are doing. Because of this, the pipeline method is hard to use on its own. It will often need to be complemented by another method (like the foundation-first method) if you want to demonstrate your game to potential partners.
For some demonstrations, you will be asked to build a “beauty corner,” which is a set-dressed stage representing the visual quality you are aiming for in your final game. This can be a light version of a pipeline demonstration that remains isolated from the playable parts of your game.
Proofing Method
This process has been mentioned before and is something that was developed specifically for making systemic games. It assumes that prototyping isn’t just a thing you get over with, but something incorporated into the entire first half of your development process.
It once more requires that everyone involved has a base level of technical literacy, or it will bog down into explanations or documentation. Therefore it only works for certain types of teams.
Quickly summarized, the process looks like this:
- Throwaway Prototyping. You illustrate with minimal-scope prototypes. Hours per prototype; a day at most. More as a kind of “designing by doing” than development.
- Proofing and Tooling. You demonstrate that a system is valid and you block out tools for that system. Each system is proofed as its bare-minimum version.
- Facts, One-Pagers, and Improvement Planning. You schedule how to finish the things you just proved, noting all the things you know can be improved. This is where technical literacy is important, since lower literacy will mean that people expect things to be more finalized.
- Merge Checkpoints. You put all the systems together to remind yourself of the product you’re making, and you expand on the improvement lists once more. Then you repeat all the steps as many times as you need to.
- Creative Direction. You invite director-types to do director-type things.
- Content Production. You use the tools to produce content and you start working through the improvement plans. This may represent as much as half of your development time, and 70-80% of your budget.
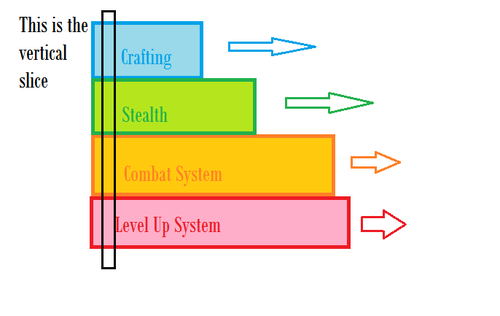
Vertical Slice Method
In most cases, prototyping becomes the realm of gameplay or technology. But that’s not the only things that need to be demonstrated. Art style, animation pipeline, menu flow, meta loops; there are so many parts that may go into the construction of a game that it’s sometimes hard to demonstrate a game’s feasibility by only demonstrating its gameplay.
This is where the vertical slice comes from. A type of prototype that strives to show a snapshot from what would be the finished game rather than just individual parts where you then have to imagine the whole.
Naturally, this means that a vertical slice is much more expensive and involves most of the roles in a development team. It’s rare for developers themselves to make this type of prototype, because there’s an unfortunately big chance that much of what gets pushed into a vertical slice has to be thrown away after completion. It comes more often from an external stakeholder’s demands.
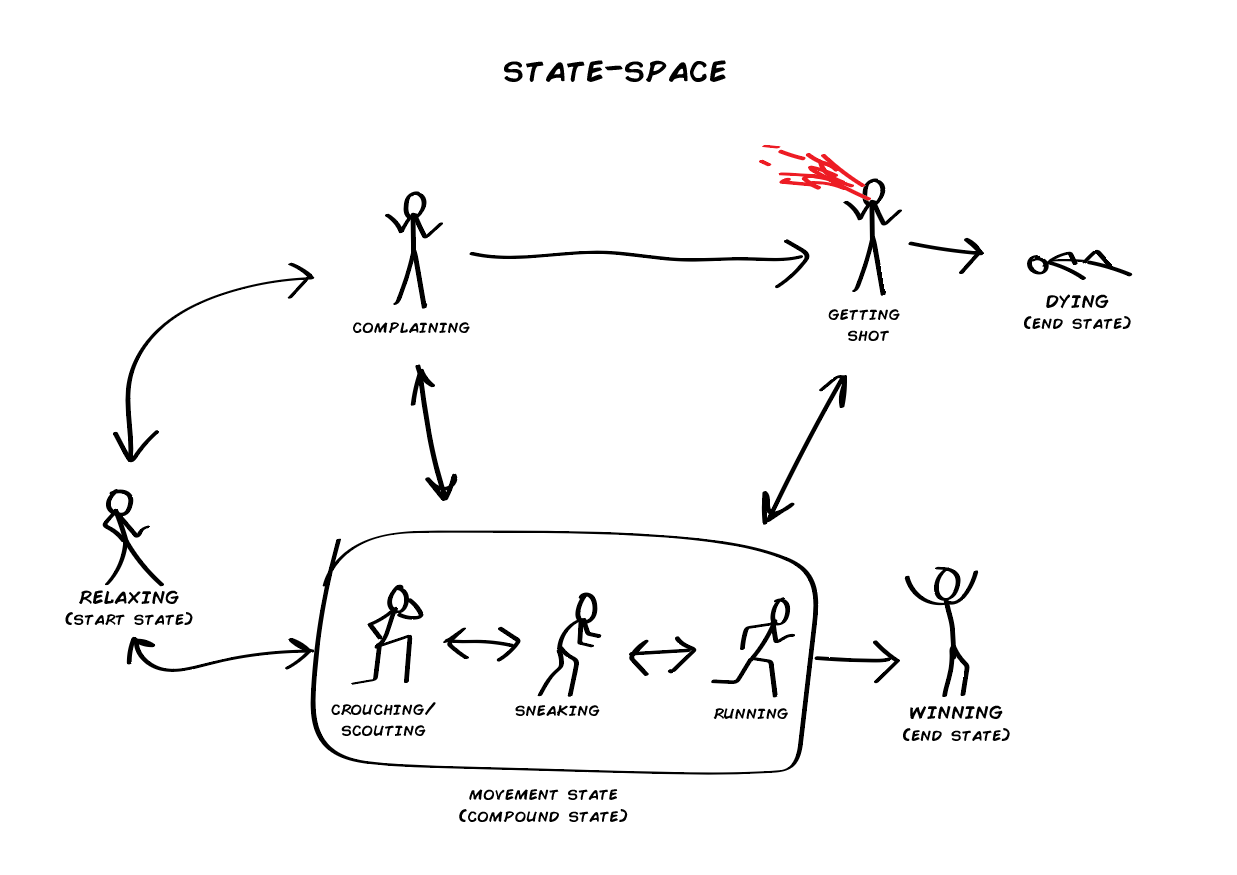
The State-Space Method
So there are many reasons to prototype and many ways to do it. Here’s another way of doing it, that I’ve become quite fond of.
To preface this, one of the most obvious traps in prototyping is that you build only what you feel like building. Either what’s fun to build, or what’s feasible in a short time. You may build “the combat system” or “the dash feature,” for example. It ends up proving a small part of your game, but not the concept of your game as a whole or even how this part is supposed to fit with the other parts. You are then forced to move on before you have demonstrated the whole, because your allotted time for prototyping has run out.
With systemic games, which are object-rich by design, these isolated prototypes can never prove the synergies or emergent behaviors of your game.
To this end, let’s introduce the idea of the “state-space” method of prototyping, which I’m going to try and describe in more detail here using pseudocode examples.
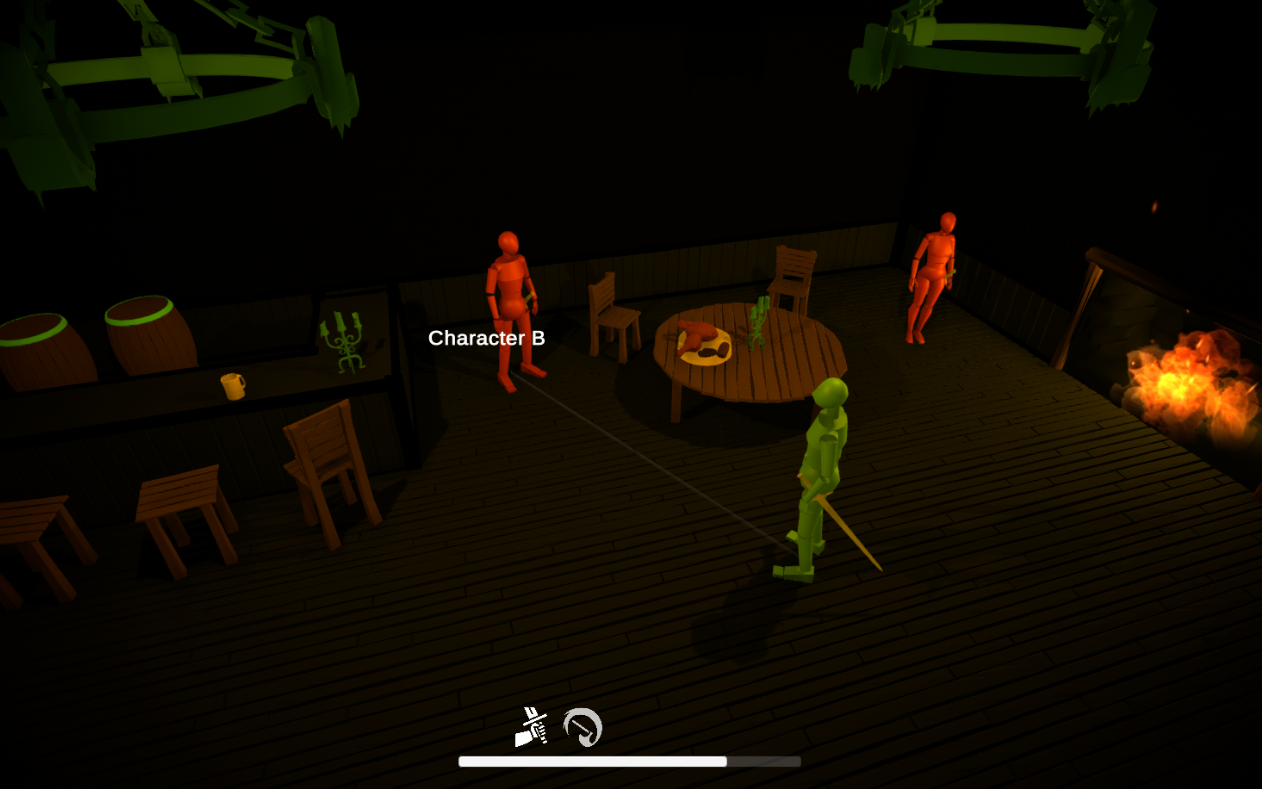
To illustrate where this is coming from, look at the following excellent video from an old Bayonetta prototype:
The way this prototype plays is clearly reminiscent of the finished game, but it eschews expensive content for representative frames and particle effects. Often representing individual gameplay events as singular frames or “poses.” State-space prototyping means applying this same principle to your entire state-space.
State-Space?
A state-space in computer science is “a discrete space representing the set of all possible configurations of a ‘system’,” meaning all possible states.
If you have the concept of health in your game, you probably have states like Healthy, Wounded, and Dead in your state-space, for example. You will also have various objects that interact with each other using their states, in order to change the states of other objects, like I’ve covered in previous articles.
The state-space method of prototyping means that you build representations of all of your game’s various states, provide hooks for transitioning between them, and then consider this your prototype. How you represent each state varies from game to game, but the simplest form means having just a line of text that says which state a thing is currently in. “Wounded.”
State
So what exactly is a state? At the lowest level, it’s simply a condition. A flag can be true or false; its current condition (say, true) is its current state. Health that turns from >0 to <0 may change a state from Alive to Dead.
To make gameplay logic happen, there are a few variants of state that will come in handy.
First of all, it makes sense to represent your basic state as an interface:
// A state is almost exactly the same as a command in the command pattern.
class IState
{
public:
    virtual void OnEnter() = 0;
    virtual EStateReturn OnUpdate() = 0;
    virtual void OnExit() = 0;
}
You’re highly likely to need to be able to reset information, set up links to targets, leaders, or other entities, and so on. Therefore, OnEnter gives you a nice place to do just that, and OnExit provides an exit point where you can do any necessary cleanup.
OnUpdate will return either Running or Completed. These are really the only considerations the state machine will have. Unlike behavior trees and other tree evaluations, the granularity of failure, cancellation, etc., is simply not relevant for this use case. Since I do provide some other return variants in my own code, this is an enum. But if Running and Completed are the only two conditions, you can easily just make it a bool and return true when a state completes.
Data States
The simplest form of state is the data state. This is something that contains crisp state; data. Many systems will want to know data directly, or at least evaluate predicates based on the data. A Goal-Oriented Action Planner, for example, operates on world state to formulate plans.
What I’d urge against is the impulse to represent all data as state. Stick to the data you actually need and make them as abstract as possible. Expose more as you go. For example, entities may care whether an entity is Dead or Alive, but not if it has Health 23.5 vs 23.2. In such a case, you only need to represent the state and not the data.
// You may want to have a template data state.
template <typename T>
class DataState : public IState
{
public:
    T Value;
}

// Or use a union to store data.
class DataState : public IState
{
public:
    union Value
    {
        float fValue;
        int32 iValue;
        bool bValue;
    };
}

// Or as a bitmask, if you want more complex states.
class DataState : public IState
{
public:
    int64 iBitmask;
}
Content States
Probably best exemplified by that YouTube clip from Bayonetta, the concept of a content state is to represent one specific piece of game content. It can be an animation, a particle effect, the condition of a light in the scene, a material, or something else. You turn it on in OnEnter and switch it off OnExit.
The key to this is to not go too deep. You’re representing your state-space: you’re not building the final game. A single color switch for a material, a single animation frame, a single particle effect spawn: keep it simpler than you think it even can be!
class AnimationState : public IState
{
private:
    SkeletalMeshAnimator* pAnimator;
    Animation* pAnimation;

public:
    AnimationState(SkeletalMeshAnimator* Animator, Animation* Animation)
    {
        pAnimator = Animator;
        pAnimation = Animation;
    };

    virtual void OnEnter() override
    {
        pAnimator->Play(pAnimation);
    };

    virtual EStateReturn OnUpdate() override
    {
        if(pAnimator->Playing())
            return EStateReturn::Running;

        return EStateReturn::Completed;
    };

    virtual void OnExit() override
    {
        pAnimator->Stop(pAnimation);
    };
}
Entity States
An entity is any interactive object in the state-space. An entity’s current state can be either an activity, meaning something the entity is actively engaged in, or a condition, which is a passive state. For example, an entity might be Patrolling as its activity, and also Falling as its condition, because it was pushed off a ledge.
Sometimes you don’t care about this level of granularity and you make no difference between activity and condition; at other times you may want both activity and condition or multiple instances of both. In those cases, you’ll either make use of a recursive state machine (see later), use more than one state machine, or employ a hierarchical state machine.
The key here is to keep it simple. If possible, separate objects into multiple conceptual entities that can have different states if you need them. For example, the Locomotion part of an entity may govern movement animation, while the Weapon part governs the current state of any equipped weapon.
class PatrolState : public IState
{
    Entity* pSelf;
    PatrolPath* pPath;

public:
    PatrolState(Entity* Self, PatrolPath* Path)
    {
        pSelf = Self;
        pPath = Path;
    };

    virtual EStateReturn OnUpdate() override
    {
        auto Distance = Distance(pSelf->Location(), pPath->CurrentNode());

        if(Distance > pSelf->GetRadius())
        {
            return EStateReturn::Running;
        }
        else if(!pPath->HasReachedEndOfPath())
        {
            pPath->NextNode();
            return EStateReturn::Running;
        }

        return EStateReturn::Completed;
    };
}
Spatial States
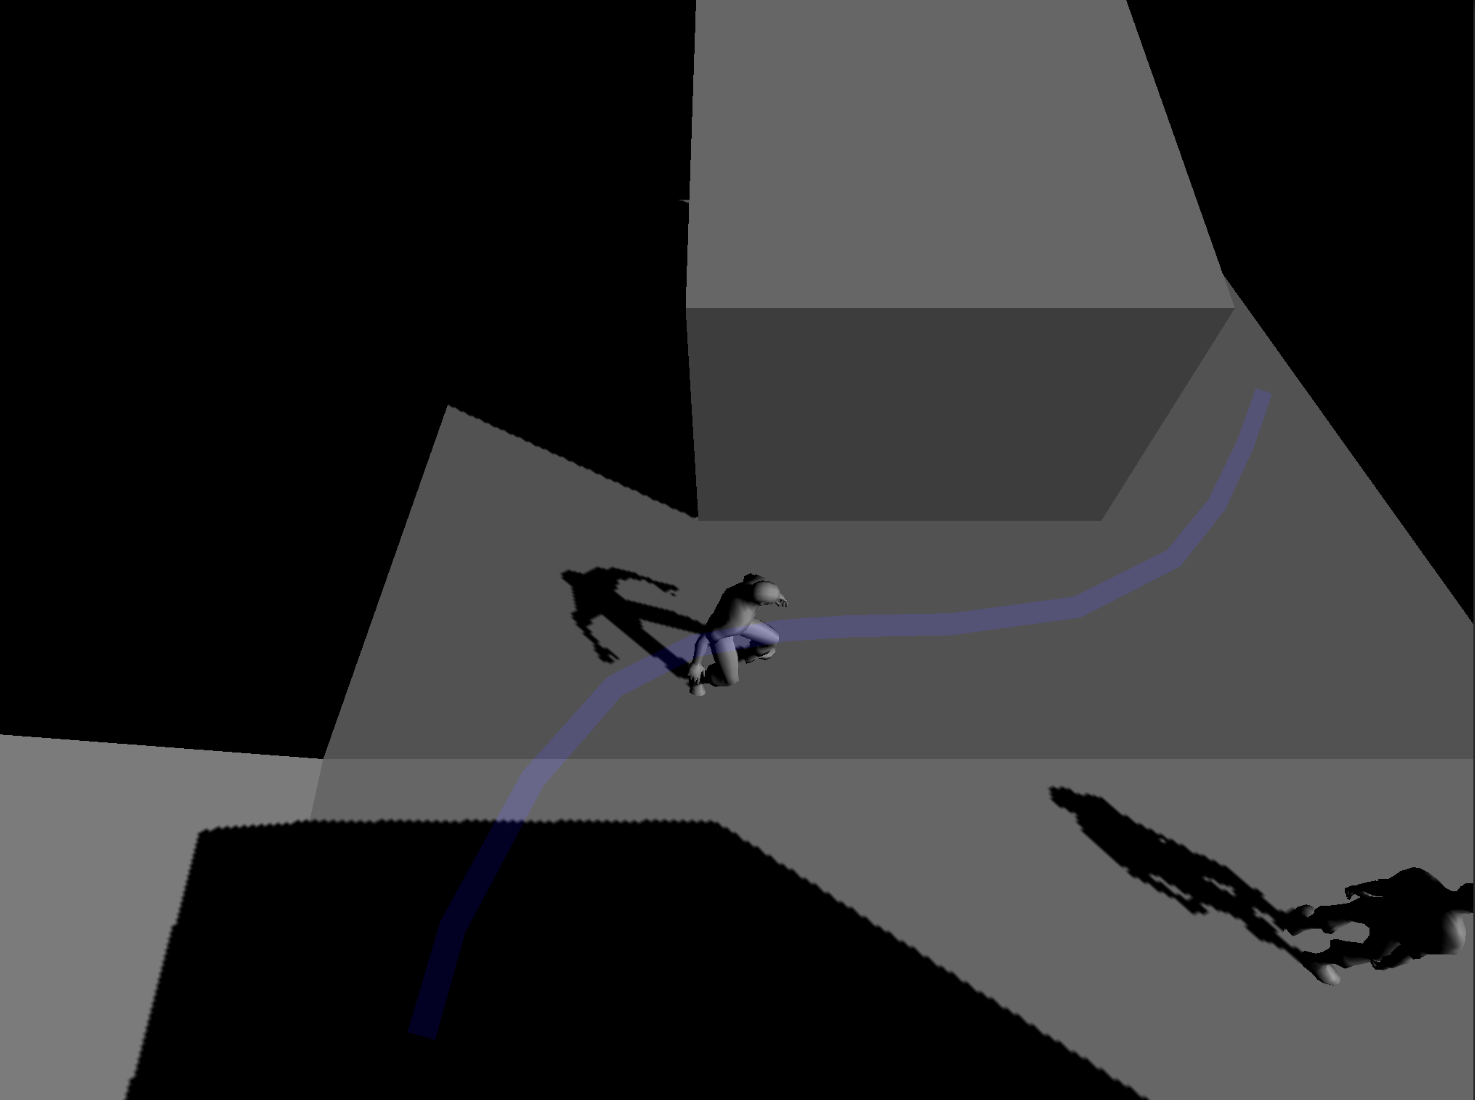
One type of state that’s usually a data state of sorts is spatial information. Basically, where an entity is. This can be relevant in many different cases, from objective completion systems (“reach the basement”) through to enemy pathfinding and entity communication (“broadcast to all neighbors: enemy spotted”).
What this requires you to do has less to do with states and more to do with partitioning. If you want to describe the world in concrete ways, like separating the Road from the Bridge from the Alley, it helps to use volumes or triggers to identify these areas and then communicate them as data state.
How complex or primitive you make your partitioning is up to you. One of my personal favorites is to describe “rooms” as separate volumes or triggers and connect them using edges so you can apply A* searches on them. It becomes a kind of logical search space that’s easy to understand. E.g., to get to the Alley you need to go from the Road to the Bridge, and then you’re in the Alley.
This also demonstrates one of the neat things with clearly communicable state: you can understand more intuitively what the simulation is actually up to if the state is simply “GoTo:Alley.”

Gateway States
In many cases, you will want to use states as a kind of locking mechanism or gateway. There are many different use cases for this, including player objectives and puzzle solutions, where the condition of another state determines completion. You may have the Victory state that plays a fancy fanfare and displays colorful on-screen pizzazz, but before that state triggers you need to complete all its preconditions,
What I personally find handy with this type of setup is that you can easily generate objectives (or solutions) as long as you store the data somewhere readily available, like a lookup table.
A templated approach means that this objective can handle anything from location comparisons to specific values (health, etc). If you want more granularity, you can easily extend this with different objective types.
template <typename T>
class Objective : public IState
{
    DataState<T>* pTargetState;
    T* pRequiredValue;

public:
    Objective(DataState<T>* Target, T Value)
    {
        pTargetState = Target;
        pRequiredValue = Value;
    };

    virtual EStateReturn OnUpdate() override
    {
        if(pTargetState->Value == &pRequiredValue)
            return EStateReturn::Completed;

        return EStateReturn::Running;
    };
};
State Machine
The engine that drives state is called a state machine. My personal go-to is what’s called a stack-based state machine. I call it a “stack machine.” Variants can also be referred to as pushdown automata.
class StackMachine
{
    // Your engine's precious last in first out structure.
    Stack<IState*> Stack;

public:
    // Peeks at the topmost state and executes it.
    // Pops any state that returns EStateReturn::Completed.
    void Update();

    // Empties the stack, removing all currently referenced states.
    void Empty();

    // Pushes a state to the top of the stack.
    // If OnEnter is set to true, it calls OnEnter on pushed state.
    void Push(IState* State, bool OnEnter = true);

    // Pops the top state of the stack and runs its OnExit method.
    void Pop();

    bool IsState(IState* State)
    {
        if(Stack.Num() < 1)
            return false;

        return Stack.Peek() == State;
    };

    bool IsEmpty()
    {
        return Stack.Num() == 0;
    }
};
What I love about the stack machine is that it will only execute the topmost state and it pops states as they complete. Because of this, states only need to keep references to the state machine if they want to push additional states on the stack. This allows you to write very lightweight states that still do most of the logical heavy lifting.
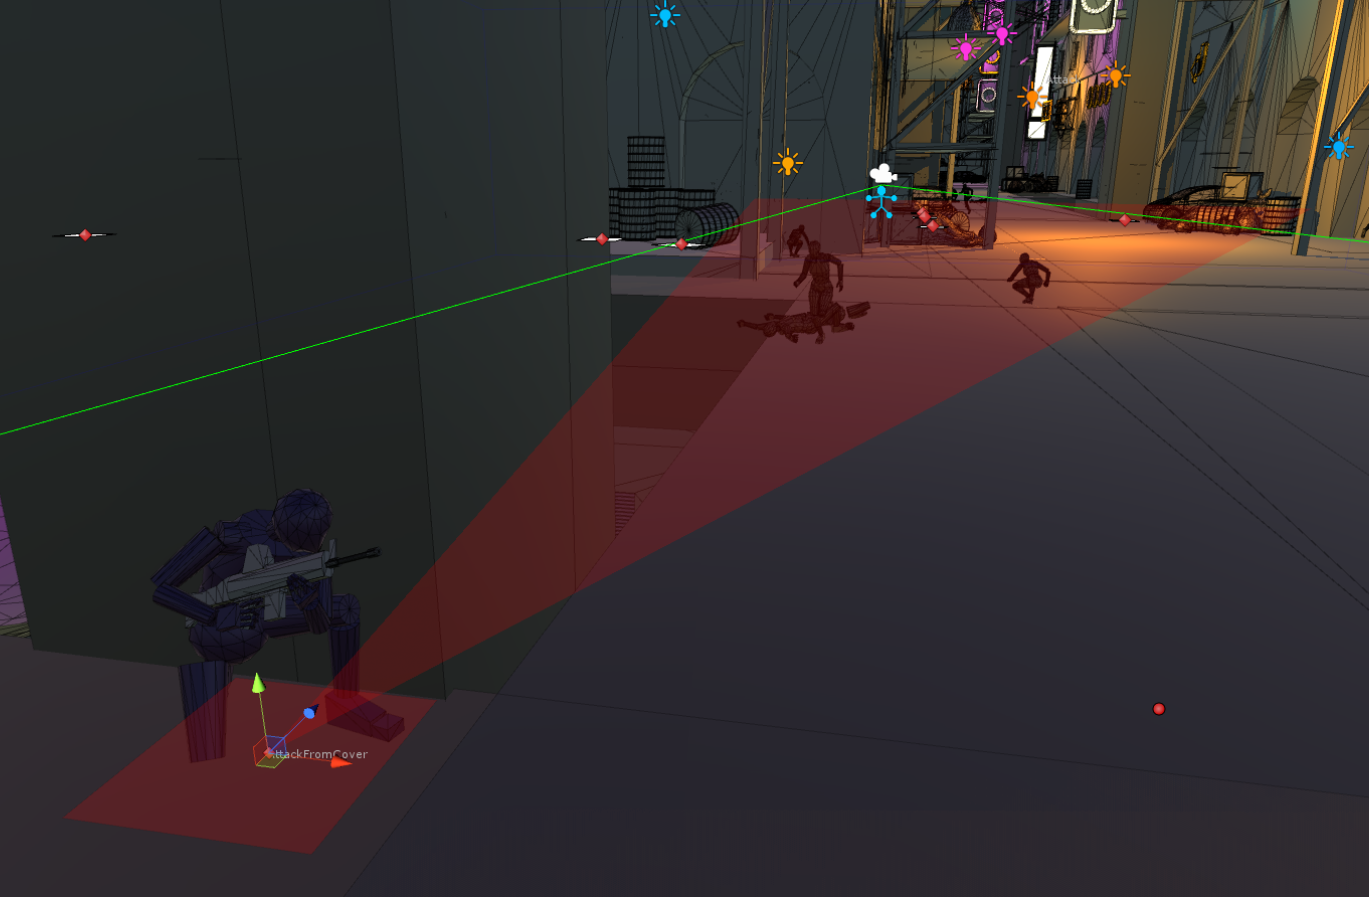
Imagine a standard shootery enemy AI, which is a use case I’ve had many times. It has some kind of Idle behavior, like Patrol or Guard. You push this on the stack first, and the AI will start acting on it.
If the AI then detects an enemy, you’ll push Attack on the stack. You may have an intermediary state here that evaluates the AI’s situation: an Assess state that gets pushed. This may then push TakeCover on the stack. Once in cover, the AI may push AttackFromCover on the stack, that executes the leaning out and discharging of their firearm that constitutes actual combat.
We’d end up with a stack that looks something like this (starting from the bottom):
- Patrol
- Assess
- TakeCover
- AttackFromCover
If you pop AttackFromCover, you’re back in cover. If you pop that too, you’re back in Assess. Maybe, if the Assess no longer has a valid target because the player ran away, you’ll pop that too and land back on Patrol.
Hopefully, you can see how neatly this encapsulates an AI’s most high level behaviors. Any details you want it to care about, you’ll add to the relevant state. Probably through heavy use of common utility functions so you don’t have to write standard code more than once.
The best part of the stack machine is that each state can own its own substates. You never need to know whether an executing state is a branch or a leaf.
Recursion and Sub-States
If you care about the execution of states below the top of the stack, the stack machine isn’t the right tool anymore. You will then need to go through the whole stack and check which states should update rather than only updating the top of the stack.
You can do this in a couple of different ways.
First, you can add an OnSubUpdate method to the interface and always go through the stack and call this method on any states that are below the top of the stack.
Second, you can use a flag in the interface to identify which states should update even if they’re not at the top and then call their basic OnUpdate method if that flag is set. It still requires that you go through the whole stack, however.
Personally, I don’t like this approach, since it ruins the neat encapsulation and means that states will have to contend with each other. For example, what happens if Patrol needs to run some things, and Assess wants to do other things with the same information? You risk having to let states talk to each other, which breaks encapsulation.
Typical cases where recursive sub-states are needed can be if you listen for input, handle parenting, or run static state-specific logic. For example, you may have a start menu that launches an Options sub-menu. The Start Menu would be at the bottom of your stack, but its buttons are probably still worth listening to if the player opens the Options sub-menu but ends up clicking something in the still visible Start Menu.
If you need this, I suggest subclassing a RecursiveStackMachine to leave the basic stack machine as clean as possible. Or consider if you should split things into multiple stack machines instead.
First In First Out
Stacks are beautiful and the stack machine is often all you really need for state-space prototyping. But sometimes, you may want your states to behave differently, or you want to process multiple states in predictable succession.
You can use the same state code without altering it, but what you could use instead of a stack machine is a queue-based state machine (or queue machine).
It’s really the same thing as the stack machine, except it incorporates first in first out reasoning instead. So rather than push and pop, you have enqueue and dequeue. This will put something at the end of the queue (enqueue) and pop it from the front of the queue (dequeue). For behaviors where you want more than one state to execute, this is perfect.
Picture an adventure game where the main character has to walk up to something, align to it, and then interact with it—that’s three states that would often be grouped together and could be enqueued one at a time to generate compound behavior.
Melee attacks can be demonstrated using this, as well. For example:
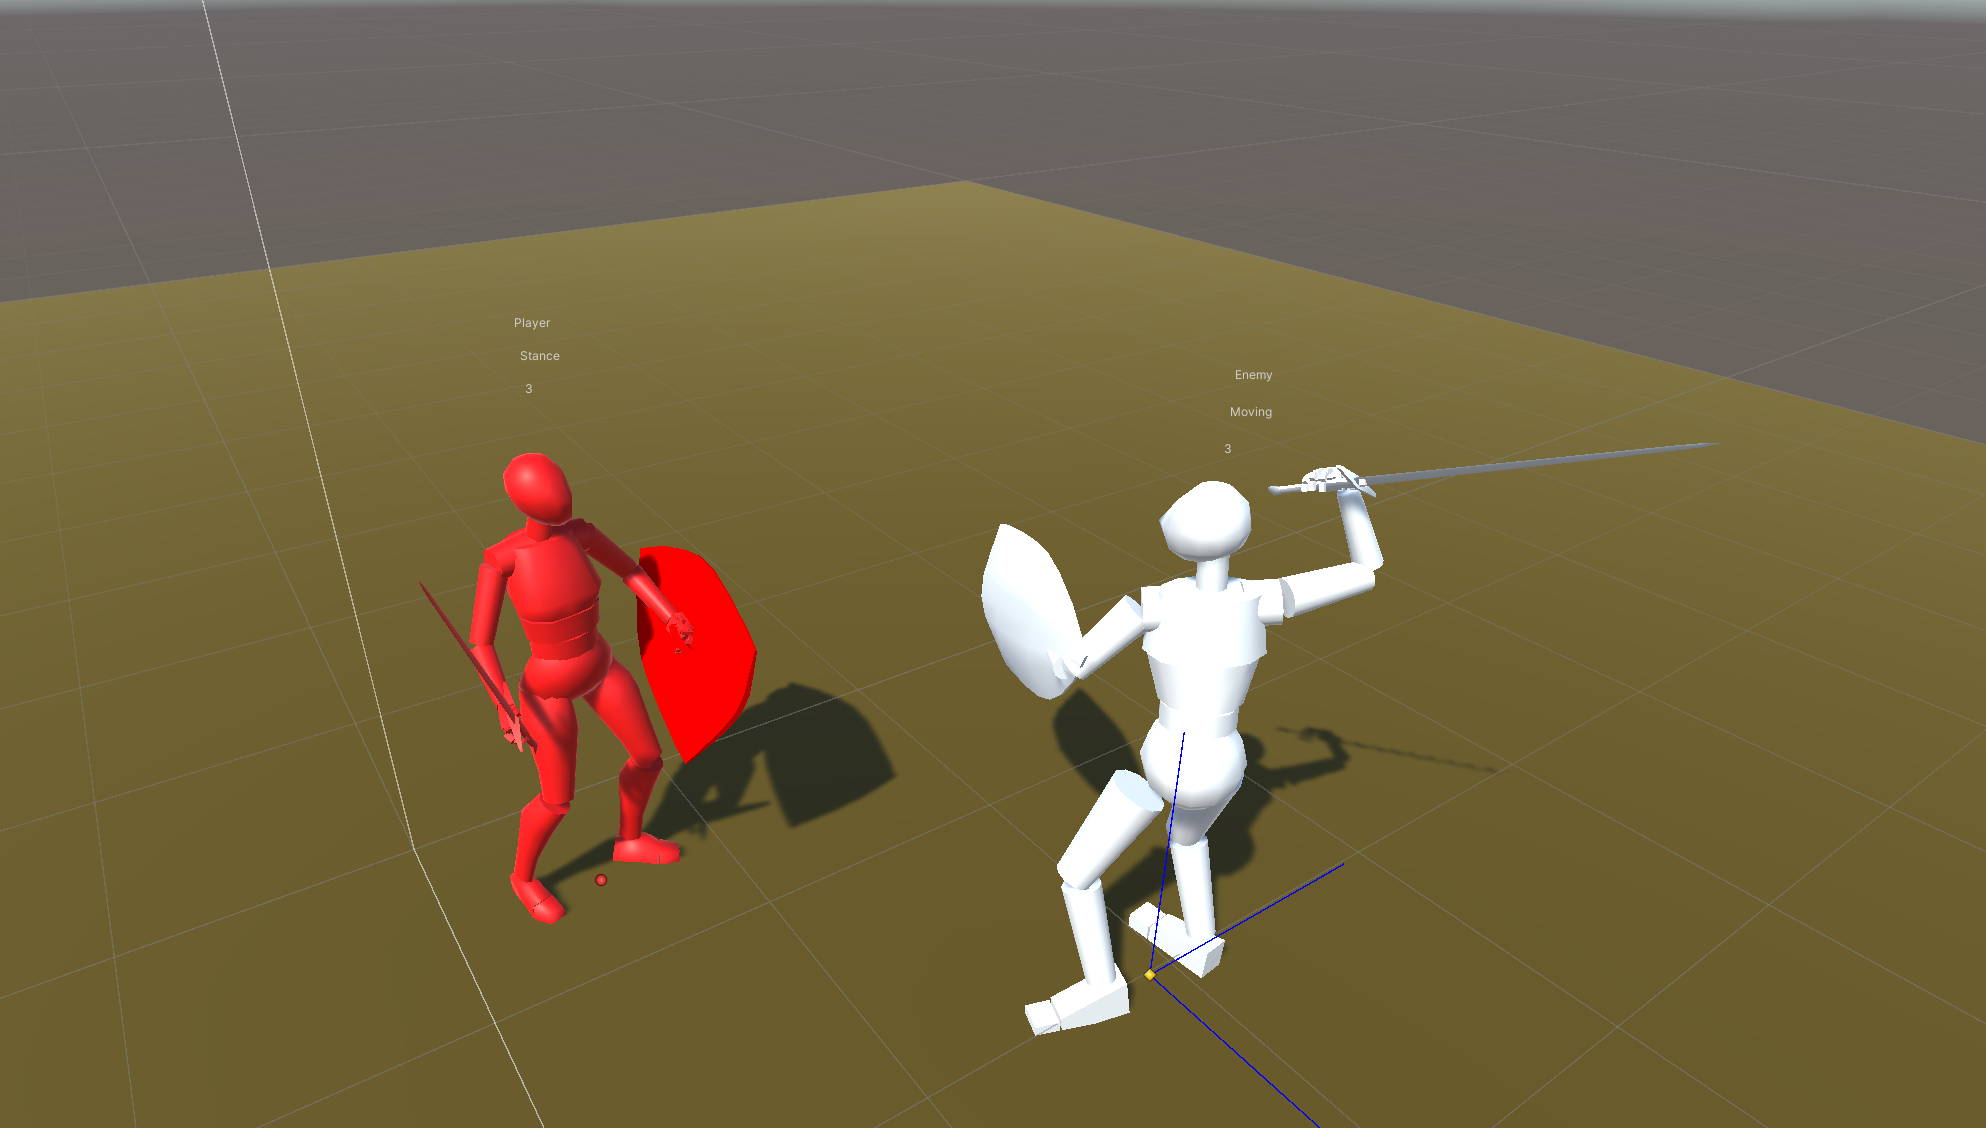
At the bottom of these characters’ stacks, you have Dead, followed by Hit (a simple knockback state), and finally Idle. Above Idle, you find the states that are tied to agency; Blocking, Parrying, Dodging, and Stance.
From Stance, an attack can be performed. This attack will then execute as a queue of specified states:
- Chargeup. The pre-attack state, usually referred to as a telegraphing state. Not sure why “chargeup” was used in this prototype. (You can’t ask me to remember the reasoning I had five years ago.)
- Moving. Going from where the character is to wherever it has to be to hit with its attack. This is the stage where it closes the distance, just like how Batman in Arkham Asylum will close in and then strike, meaning that the player doesn’t have to judge distances.
- Attack. The final stage of the actual swing that presumably connects with the enemy. This is guaranteed to hit, the way this setup works. But if the enemy avoids the attack (block, dodge, etc), it will yield a different outcome than if they stay Idle or in Stance.
- Winddown. A sort of pickup state that can be used differently if the attack connects or is blocked/dodged, and will then get popped along with the whole queue, returning to Stance or Idle as appropriate.
As you can tell, this queue is actually executed inside of a state. The entity isn’t running a queue machine but a stack machine that’s executing a queue as a single state. This leads us to the last point on state machines.
States Within States
If states contain finite state machines of their own, you transform your finite state machine into an hierarchical finite state machine. There’s not much to this, really.
Just let this piece of pseudocode illustrate the concept:
// A hierarchical state simply updates its own state machine internally.
class HierarchicalState : public IState
{
    StackMachine* pLocalStackMachine;
    IState* pIdleState;

public:
    HierarchicalState(IState* IdleState)
    {
        pLocalStackMachine = new StackMachine();
        pIdleState = IdleState;
    };

    virtual void OnEnter() override
    {
        pLocalStackMachine->Push(pIdleState);
    };

    // If the local stack machine is empty, this state has completed.
    virtual EStateReturn OnUpdate() override
    {
        pLocalStackMachine->Update();

        if(pLocalStackMachine->IsEmpty())
            return EStateReturn::Completed;

        return EStateReturn::Running;
    };
}
This does add some complexity, but since states are always treated the same, the stack or queue machine that drives it doesn’t have to care whether the current state has its own complexities to consider. All it cares about is what’s returned when it calls OnUpdate.
One of the best uses of hierarchical states is for content state, like the previous melee combat example where you want to play specific animations at different points in a specific chain of events. Particularly if that chain doesn’t need to be interrupted.
Transitions
States are great and all, but your state-space is determined more by how you transition between states than by the states themselves. This may require external structures and partitioning to facilitate communication between entities, but the key is once more to try and keep it as simple as possible.
State Injection
The most direct way to manipulate state is to simply change it from an external source. To “inject” an entity’s new state. This is what you do when you deal damage to something, or speak to it, or push a button. One entity is directly manipulating another entity’s state.
In stack machine lingo, this can mean completely overriding what a stack machine is already doing, or pushing a new state on the stack from an external source. Usually with some kind of wrapper. Like a door:
class Door
{
    /// FSM, for Finite State Machine.
    StackMachine* pFSM;

    SkeletalMeshAnimator* pDoorAnimator;
    Animation* pDoorClosedAnimation;
    Animation* pDoorOpenAnimation;

    IState* pClosedState;
    IState* pOpenState;

public:
    Door()
    {
        pClosedState = new AnimationState(pDoorAnimator, pDoorClosedAnimation);

        pOpenState = new AnimationState(pDoorAnimator, pDoorOpenAnimation);

        pFSM = new StackMachine();
        pFSM->Push(ClosedState);
    };

    // Entities that interact with the door will "inject" state based on the door's current state.
    void Interact()
    {
        if(pFSM->IsState(pClosedState))
        {
            pFSM->Push(pOpenState);
        }
        else
        {
            pFSM->Pop();
        }
    }
};
Time
For pretty much every interaction and gameplay state you need you are likely to want to tweak its timing. How long it takes to jump, how quickly you accelerate from standing still to full speed, etc. All of these require time, and a state that runs a timer can easily reset it in its OnEnter method, then return EStateReturn::Completed when the timer has run its course.
This is of course the place for easing functions and other tweening methods, and the place where much of your “juiciness” will happen in prototyping. It’s therefore one of the most important things you need to support in your states.
class TimedState : public IState
{
    float fDuration;
    float fTime;

public:
    TimedState(float Duration)
    {
        fDuration = Duration;
    };

    virtual void OnEnter() override
    {
        fTime = 0.f;
    };

    virtual EStateReturn OnUpdate() override
    {
        fTime += fDeltaTime;
        auto T = fTime / fDuration;

        // Make use of T for whatever interpolation you have in mind.

        if(T >= 1.f)
        {
            return EStateReturn::Completed;
        };

        return EStateReturn::Running;
    };
}
State Change
Some state will change because other state changes. If the sneaking thief goes from Hidden to Visible, the patrolling AI may go from Ignorant to Suspicious as well. Because of our thus far fanatical encapsulation of states, this requires that any entity that cares about other entities has an efficient way of knowing when this occurs.
This can make use of spatial partitioning, as already mentioned, or it can be a message dispatcher that sends callbacks based on state changes in the simulation. For most use cases, it’s good enough to refer to entities directly and evaluate state changes within specific evaluation states (like the Assess state mentioned before).
You may also want the concept of knowledge, using a blackboard or similar, where an entity keeps note of all the references it may care about and state can then refer back to the entity’s knowledge at any moment using nothing more than a reference to the entity itself.
Conclusions
Hopefully, this piece shed some light onto why you should prototype your games, how you can do it, and also on the more specific state-space method of prototyping. This article was written to try and define these concepts in more detail, since many of them have been accidental discoveries and not as clever or thought through as this writing may imply.
The best takeaway you can probably make is that you shouldn’t prototype “willy-nilly”—you should figure out what you are doing and why. If not, the costs are likely to outweigh the gains.
And as always, if you disagree, please do so in comments, or to annander@gmail.com.

I finally read through this blog post, because you linked it to me some time ago. I do see the advantages of using states, especially, because you often really only care for the state or the state change and you don’t care for specific values. That’s a neat concept especially with the Enter and Exit methods etc that can all emit Events/Signals so others can react on it.
Regarding reaction. How do you solve it? Do you check for the state in a huge switch case or what’s you architecture for that?
Let’s say an enemy changes its state from Healthy to Wounded and nearby NPCs should heal him if they’re able to. How would the reaction look like in that case? I hope the answer isn’t already in the article and I just didn’t understand a concept :D.
Thanks again :)!
This is where the real beauty of a systemic approach comes in. All of those communications are object interactions, as I cover to some extent in the An Object-Rich World article (https://playtank.io/2023/08/12/an-object-rich-world/).
How such state changes are effected depends on what kind of game you’re making. But physics simulations are a classic (e.g., contact stims in the DarkEngine approach), and you can also have some variation of dispatcher/Observer pattern (great writeup here: https://gameprogrammingpatterns.com/observer.html) that communicates state changes.
Another way, which is a bit more content-intensive, is to explicitly couple which objects should listen to which state changes. This is more the territory of tooling, however, and easily risks becoming technology instead of systems. But in some cases, like narrative scripting, it makes sense to do things in that way.
Basically, there’s no short answer. It’ll depend on the needs of your game.