
On this next step in my sporadic systemic design journey, I will try to explore the intricacies of how to build a good first-person camera. Maybe even a great one. I will touch on the basics of making it, too, but there are many things that aren’t related to the camera directly but to everything else in your game, and it gets hard to get into details on implementation without having a specific game in mind.
As part of the 3Cs (Controls, Camera, Character), the camera is fundamental to the game feel of your first-person game. I will cover the other two parts of that holy trinity in future posts, if/when there is time. I started with the camera.
Intro to First-Person Cameras
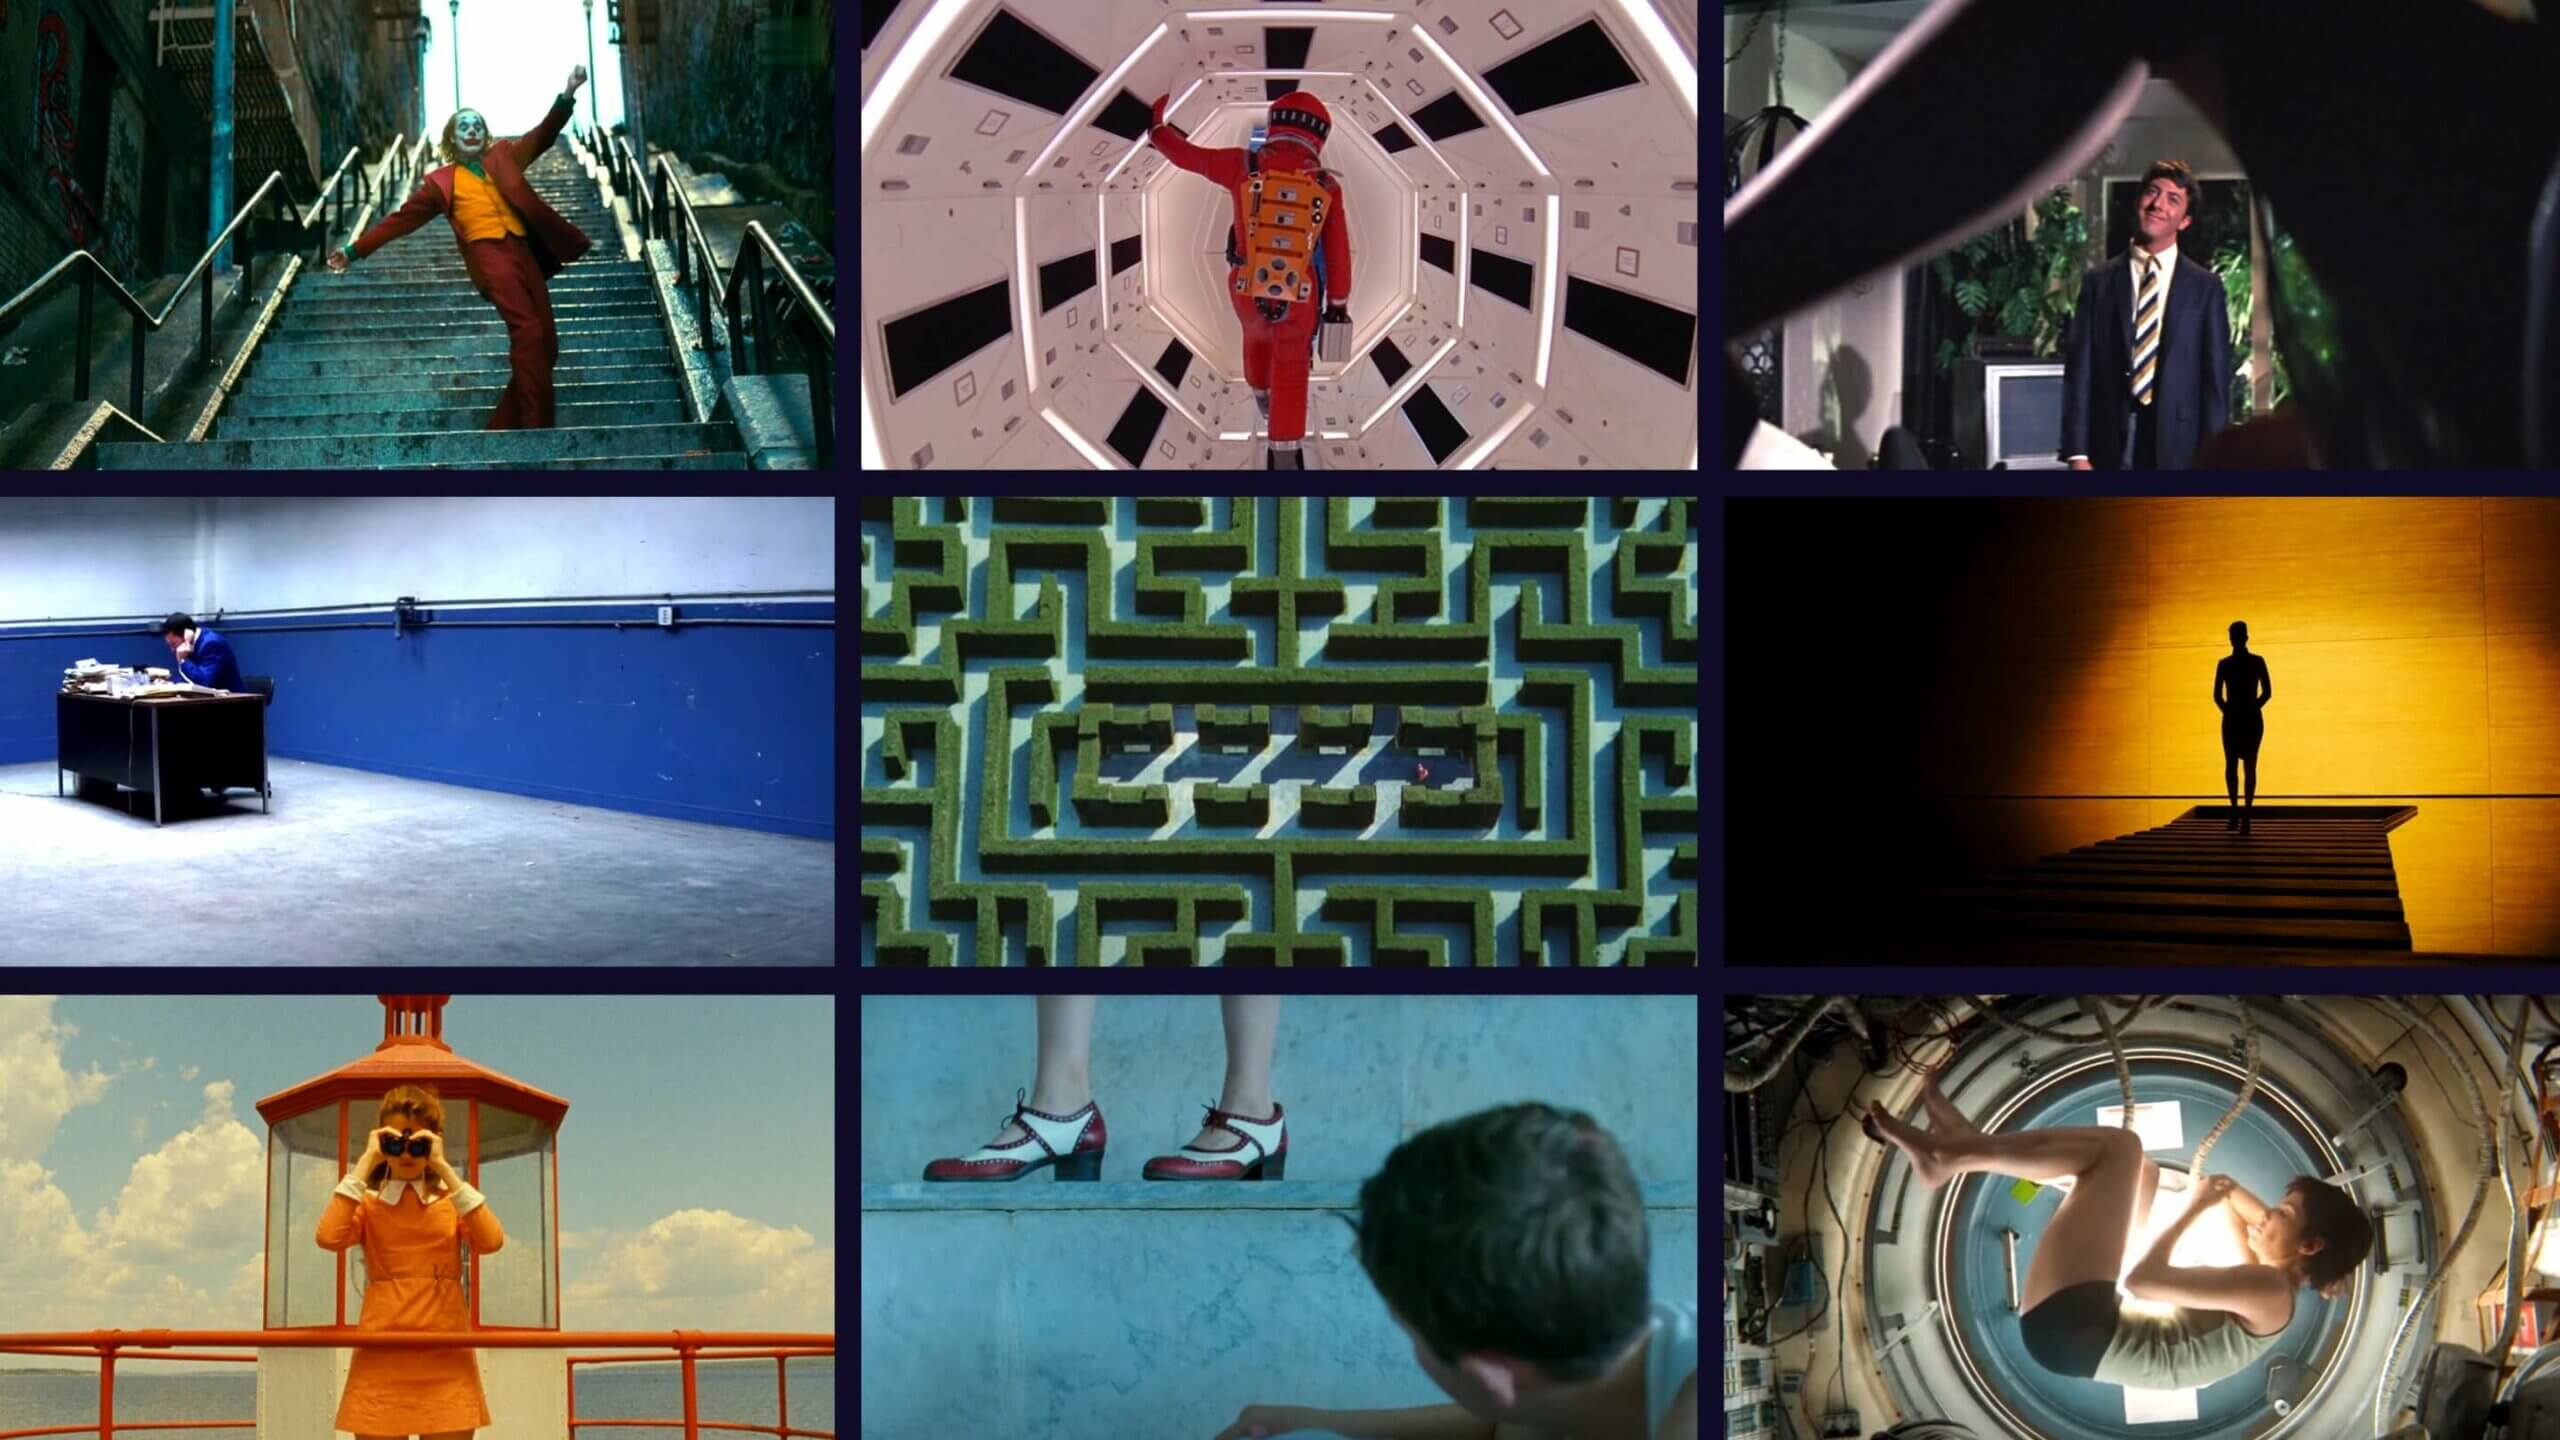
First-person games have been around since the early days of game graphics. It wasn’t until the 90s that the perspective became synonymous to aiming, shooting, bombastic setpieces, and chained explosions. Before then, we sat in the cockpits of lineart space ships and explored scary dungeons in many different kinds of games. Along the way, the first-person camera has been given a ton of attention. Both of the technically complex sort and the visual sort.
There are also some artifacts we are carrying with us that are worth mentioning.
Planar Alignment
Grid-based dungeon crawlers used a different kind of rendering than what we are used to today, where they rendered bordering tiles based on your placement in a grid. This meant you couldn’t look up or down, because functionally there was no up or down. You had the screen you were looking at, and you could move between screens.
Extrapolate this onto some better hardware and you get the raycasting renderer, projecting a three-dimensional image into two dimensions. But it’s still not “real” 3D, and most levels are defined as two-dimensional line maps. There can still be multiple levels, and some games, like Shadow Warrior, used portal techniques to fake things like multiple overlapping floors. Because full vertical 3D was the goal, even if the horizon was still our main frame of reference.

meaning that it’s not trivial to make lower/higher levels.
Extrapolate even further, through binary space partitioning and onwards, and you finally arrive at the fancy polygonal rendering techniques of today that allow full 3D.
But we’re still mostly stuck to horizontal alignment. Not for technical reasons, but for human ones. Our planet-locked existence is always stuck to the horizon, leading to glances up or down feeling less natural to us than looking across the horizontal plane. It’s the same in first-person shooters.
Level designers may sometimes trick players by putting things farther above or below the horizontal plane, forcing players to look up or down after stumbling around for a while in bewildered confusion. More often, we simply don’t do all that much verticality, because most of the ways we can remind the player to look up or down feel somewhat contrived and there’s no way to “win” over lizard brain intuition.
Planar alignment is as good a place as any to start this first-person camera journey. Your camera will benefit from honoring horizontal planar alignment, almost no matter what you are working on. It affects everything from where you should put your highest quality art assets to the way you handle gameplay interactions.
Does it mean you shouldn’t break this alignment? Of course not! You just have to know why and how it matters, and what may happen if you do. This notion that you need to know the rules before you break them will stay with you throughout this piece–it applies to more areas than planar alignment.
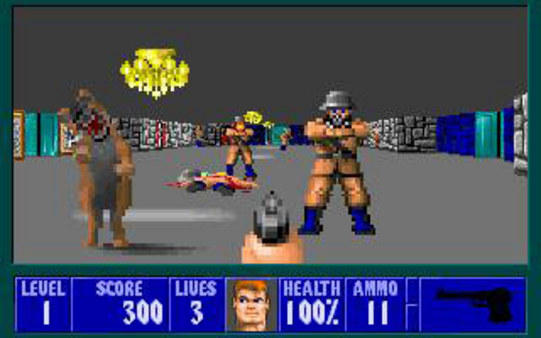
and undeniably demonstrates horizontal alignment.
Axis Alignment
Some of the decisions that were made for performance reasons have also created game feel that we have gotten so used to that we are mimicking them to this day. One such thing is the Axis-Aligned Bounding Box. A cheap and effective way to model the collisions of a player character with an axis-locked box that never rotates. In first-person shooters, the locking axis is the world space “up” vector pointing towards the sky.
This means that the camera will remain horizontally locked and that the player’s character can’t fall, stumble, lean, or be affected by the game world in any way that would break this axis alignment. Even if first-person games have used everything from sphere collections (like a snowman shape) to capsules and onwards, they have still kept this axis-alignment. You don’t fall in first-person games, unless it’s very carefully directed.
This isn’t entirely for performance or tradition reasons either. If you break this axis alignment and rotate the camera on its forward axis, it’s one of the many ways first-person cameras can cause nausea for some people. The gyro in our brain wants the horizon to stay right where it is when our body isn’t moving, and for some players, breaking this relationship between horizon and brain makes for a bad–potentially vomit-inducing–experience.
So once more, this is a bit of performance optimization that led to game feel that has stayed with us for more reasons than performance.
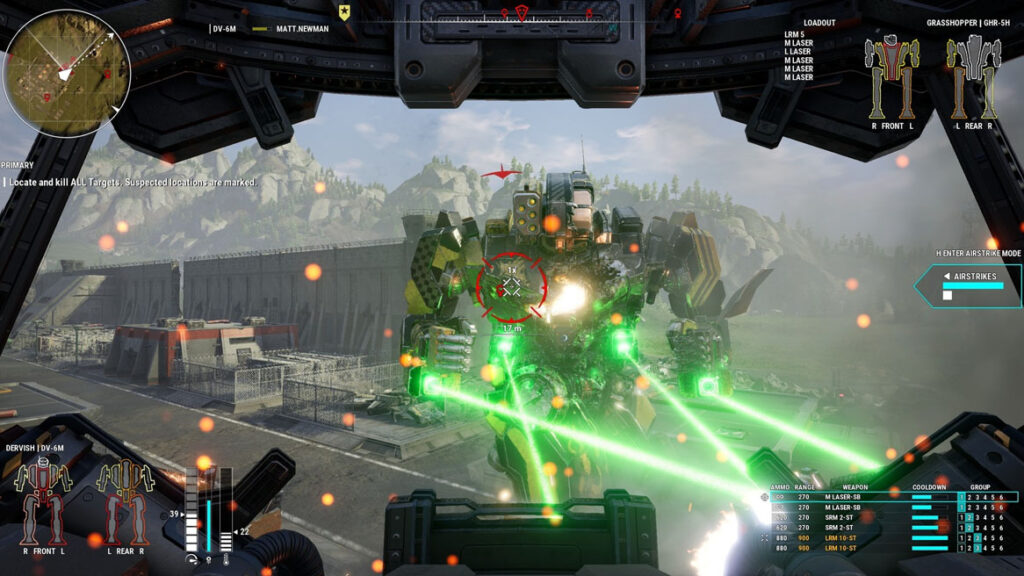
But it still acts like an axis-aligned first-person shooter.
Lens Simulation
One of the more frustrating trends for game cameras (in my opinion) is the drive to have them emulate physical camera lenses. This sometimes causes considerable issues. Not least of all for accessibility reasons, with seemingly arbitrary blur and glare that affects the readability of the final image.
Motion blur and eye adaptation are two of the most common ones, but any post effect that’s there to behave like an expensive movie camera and not to make the game experience better or the information in the game clearer is a good example. Bokeh. Bloom. Depth of Field. Chromatic aberration. You know all of them already, if you’ve played a modern first-person shooter, and chances are you never actually thought about them.
The idea seems to be making a more realistic camera rather than to make a more playable one. But your first-person game camera is not a real physical camera, and almost all the ways you make it seem like one will make your game harder to play.
Where planar and axial alignment is here to stay, let’s hope that lens simulation eventually stops.
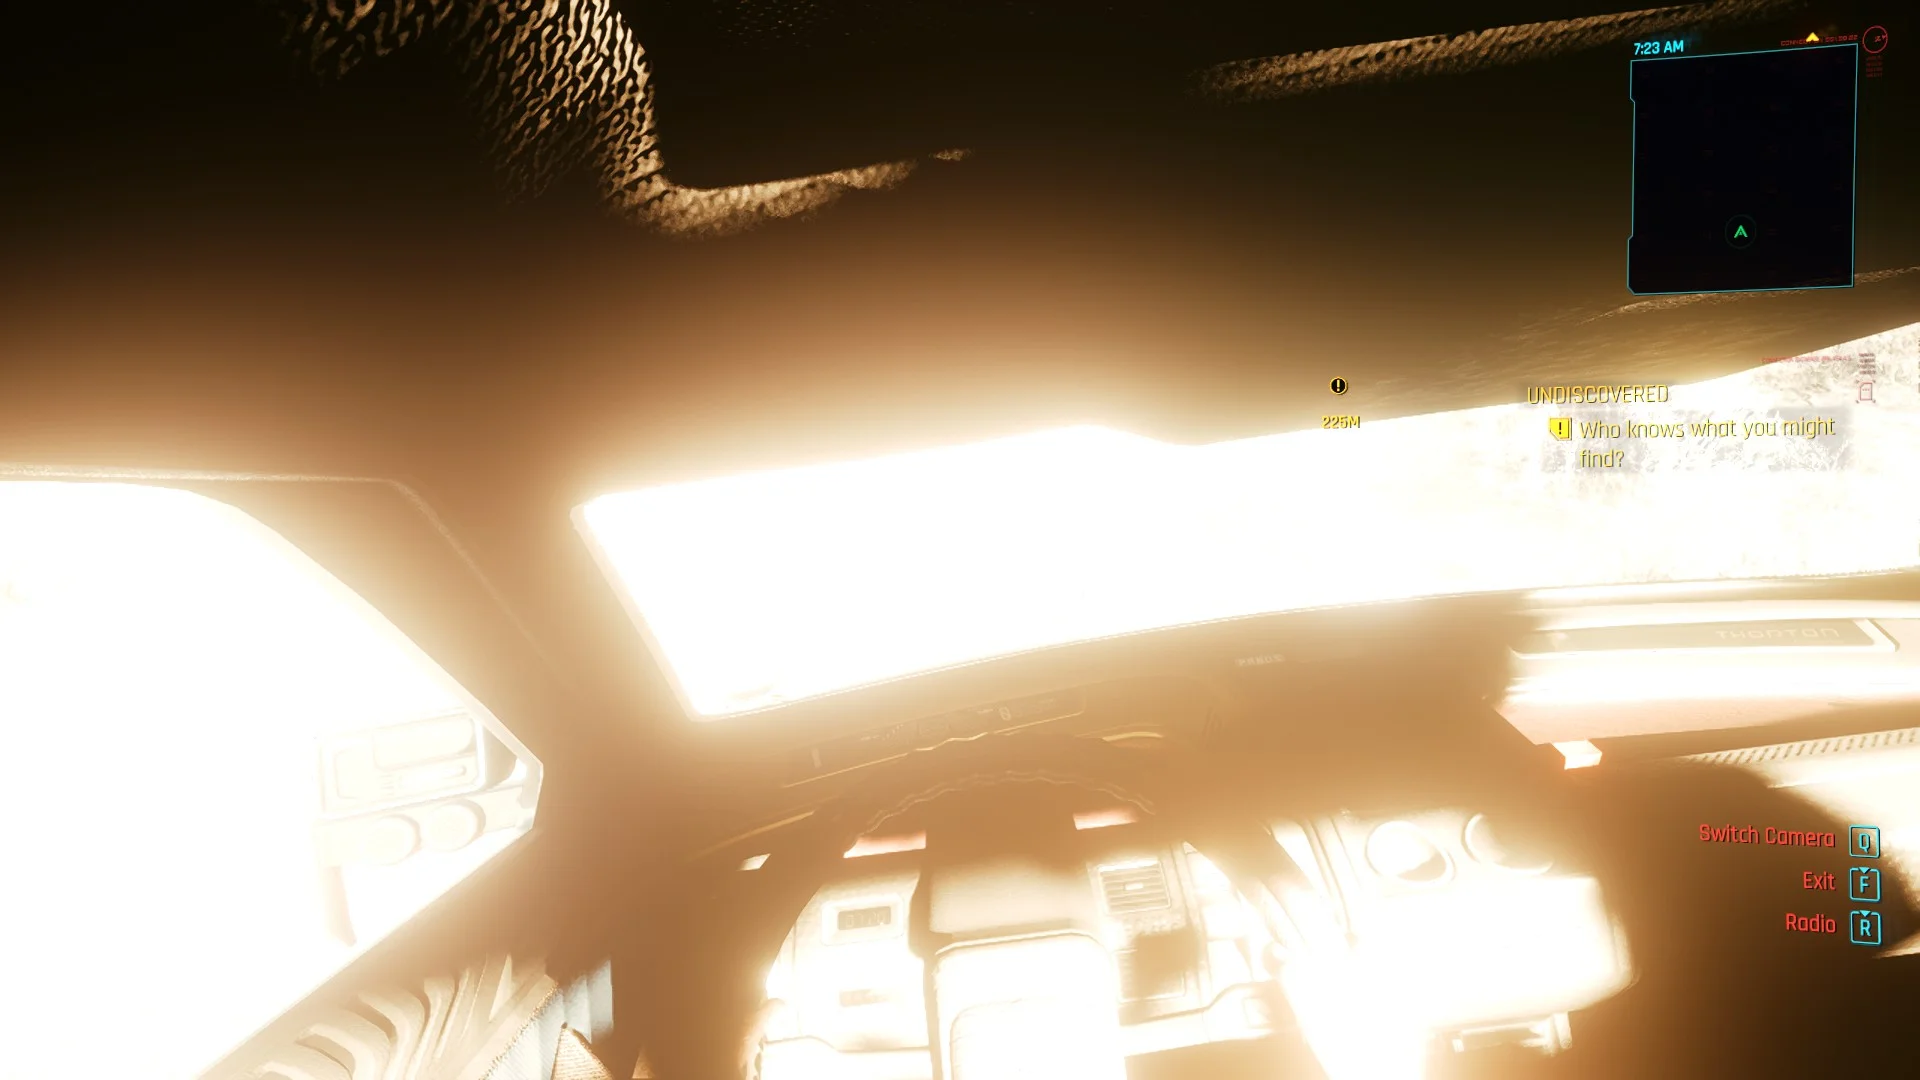
let’s balance out the praise with this eye-watering eye adaptation effect.
Motion Sickness
Some people are affected by motion sickness when they play first-person games. This effect is something that can typically be mitigated at the design stage. Some people will experience it no matter what you do because they are particularly sensitive to the strange motion of the screen, but there are at least some solutions you can try.
There are primarily three reasons that players experience motion sickness: motion that is felt but not seen, motion that is seen but not felt, and also discordance between seen/felt. The first would be something like sea sickness, while the second is what can be caused by some camera solutions. The third can kick in with something like VR gaming, when your virtual rollercoaster ride spins through its narrow turns but your body doesn’t actually feel any motion. Doesn’t prevent you from falling over anyway.
It’s generally when you fight against your brain’s intuition that you experience nausea.
Common Sources of Motion Sickness
- Tilt on the forward-axis. Probably the most common source is when you tilt the camera on the forward axis. A sideways tilt. This will cause nausea for some because your body isn’t actually moving sideways even though the camera is.
- “Head bobbing.” This is implemented differently in different games, but causes nausea because your body isn’t experiencing the motion even if your eyes are registering it.
- Shake and other noise. Why you always want camera shake and its like to be optional: to some players, it causes nausea because your body isn’t affected by the same tilt.
- Animated camera control. If the game takes arbitrary control of a first-person camera, it can also cause nausea. Again, because the body is not experiencing the motion. This can be mitigated somewhat by adding “cinemascope”-style black bars, because then the player can intuitively understand that it’s currently an animated sequence and they are no longer in control.
- Motion delays. Finally, lag or delay in the motion of the camera can cause nausea. This gets amplified considerably in VR, to the point where some players can feel physically sick. But drawn-out motion can cause motion sickness even in standard first-person games.
Cinematography and Cyberpunk
My general stance is that games gain nothing from striving to be cinematic. It’s like movies trying to be more theatrical. Theater will forever do theater better than movies do. Games are better at being games than they are at being movies. And yes, movies are better movies than games can ever be.
But cinematography, on the other hand, is a craft that has been perfected by the Hollywoods of the world through over a century. It’d be madness to ignore the lessons learned. So let’s take a fleeting look at cinematography and some of its interesting takeaways. Just note that it’s a layman’s look–I’ve never worked in film and likely never will. My interest is how we can take lessons from here and bring them into gameplay in a systemic way.
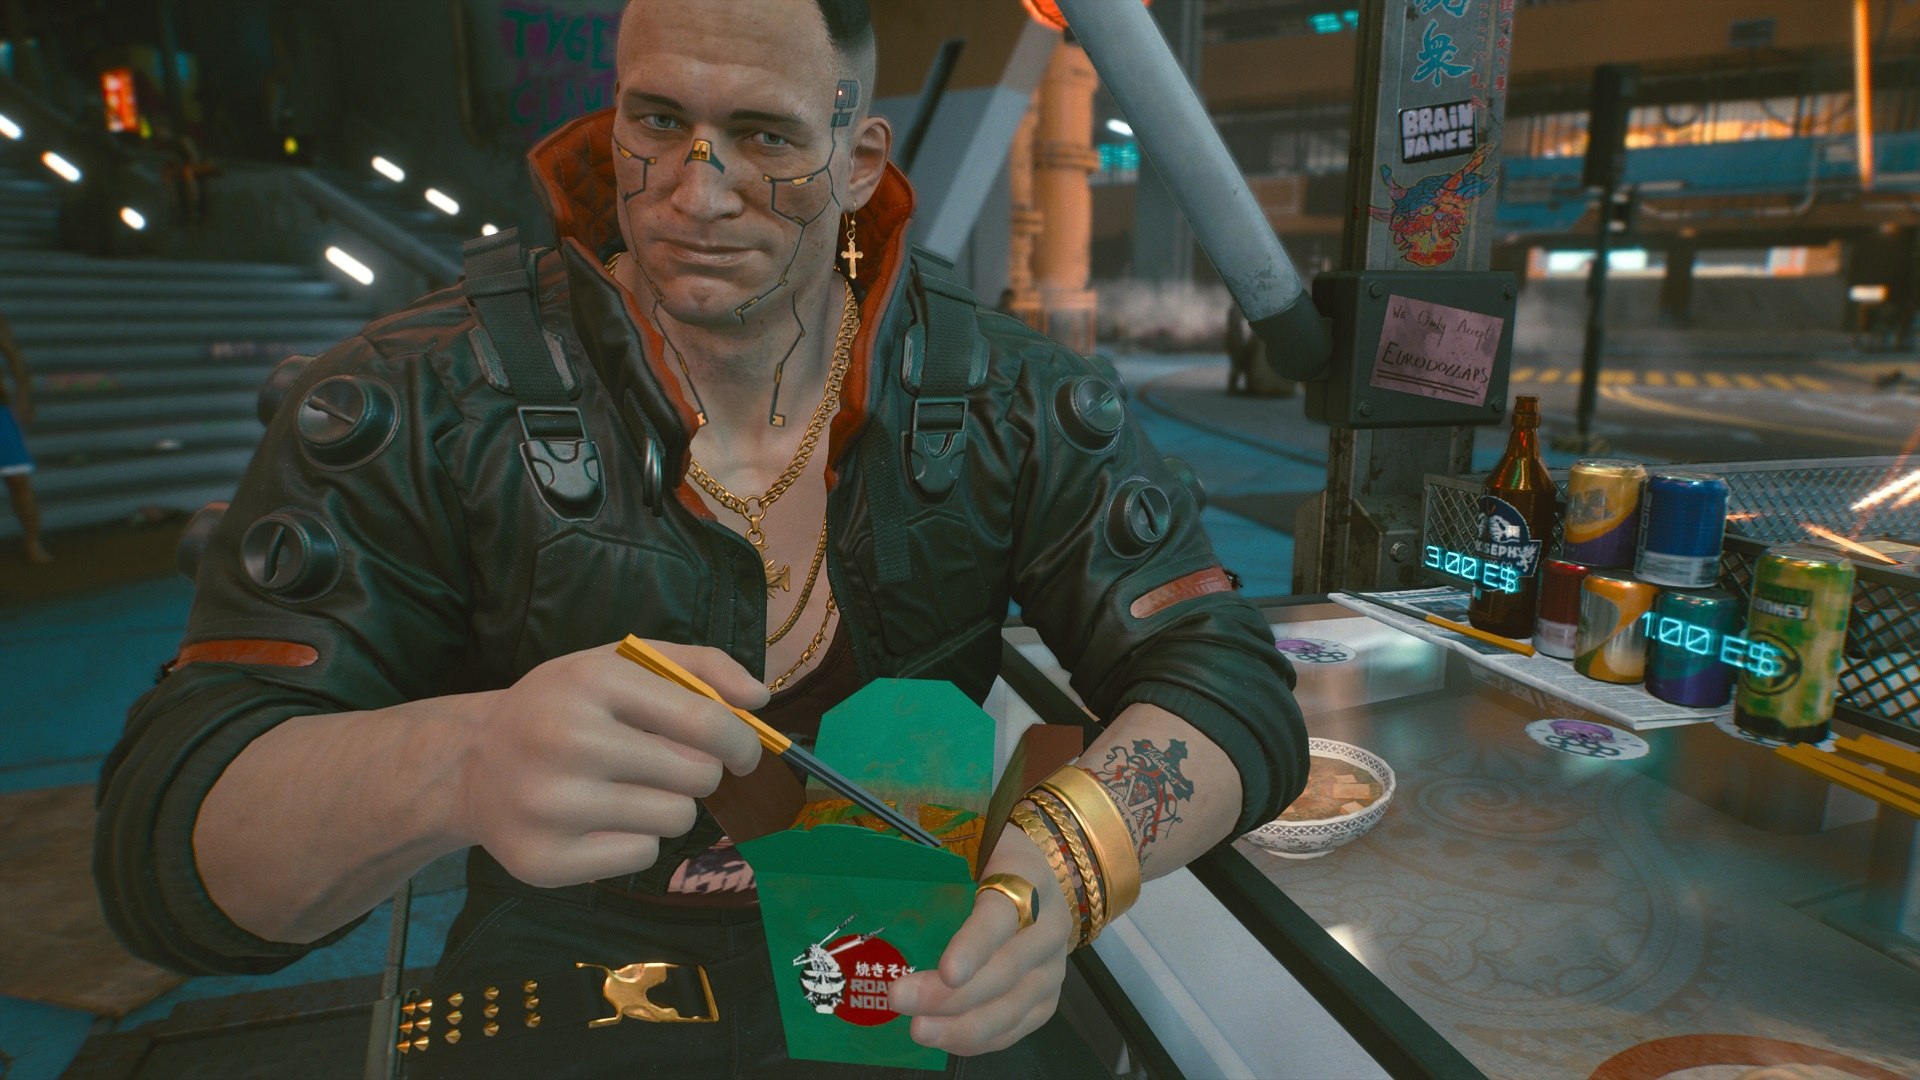
where the camera is cropping the top of his head. A general no-no in cinematography.
Framing
The frame is your whole product in a film. Each of the thousands of frames in a feature film is a consciously designed work of art directing the audience’s attention to where it needs to be. In games, framing is more about predicting where the player will look or guiding where they should look than it is about directing the player. But the same thinking still applies.
There’s plenty of material on the Internet, and there’s also Blain Brown’s excellent book you can pick up if you want to learn more. But as a short glimpse into what cinematography means, you have the rule of thirds, which divides the screen into thirds along both axes. This gives you nine rectangles of focus, and the lines between them, where to direct viewer attention. It’s a great guideline for framing.
The 180-degree rule tells you to respect the direct line between two objects interactig on the screen, for example characters who are talking to each other. Once you pick a side on this line, you shouldn’t rotate the camera to face from the opposite side of the same line, since this risks confusing the viewer.
The use of leading lines and frames within the frame to direct attention are also a form of rules. If you are looking at a painting on a wall in the frame, your eyes will go to the painting. If there’s a horizon or a stone wall leading towards a tower, this will also direct your attention.
You also usually want to achieve symmetry, with an equal balance in composition between the two sides of the frame. Meanwhile, you want to fill the frame to avoid too much dead space, unless you want to actively achieve emotional isolation. This “except” and “unless” stuff is important: as with any rules, you need to learn them before you can break them.
There are rules for depth and scale. Some leaves in the foreground to show you that your perspective is from the point of view of someone hiding in the undergrowth, for example. But also continuity and establishing. For example, if a character looks down at something, and then you cut to a letter on a table, the viewer understands that this letter was what the character was looking at.
All of this requires camera control, however, and camera control is no-no for first-person games if you want to avoid nausea. In fact, full first-person control can be inspired by virtual reality design and some of the lessons learned from there.
But I’ll focus on something else, even if VR design is interesting in this context, even for non-VR games. I’ll focus on the work of CD Projekt RED’s cinematic team on Cyberpunk 2077. Something Story Mode got to talk to them about, and something that’s extremely inspiring if you want to make first-person cameras.

The interview, and the game of Cyberpunk 2077, touches on exactly the things we need to make our systemic camera. From my perspective, being primarily interested in gameplay, it emphasizes three things:
- Differentiating between noise and signal (Pawel Ochocki.)
- Players subconsciously go where the best content is. (Igor Sarzyński.)
- We want characters to engage with.
Noise and Signal
Fundamentally, the frame’s purpose is to inform. Igor Sarzyński asks the question, “are you distracted, or are you perceiving what you should be perceiving?”
With the cinematographic rules I mentioned previously, this is presumed to be up to the camera crew and director to decide. In a dynamic first-person game, you can’t control anything. You shouldn’t control anything. This means that the methods used must be much more subtle.
Noise is all the things that you shouldn’t be paying attention to. Extra empty chairs that distract you from the person seated at the table. Animated screens. Traffic passing by. Pedestrians walking past. Horses neighing. Whatever your game has that’s currently not important.
The signal, on the other hand, is the focus content. The thing you want the player to look at or to experience right at this moment. This signal can change through the course of a set, and the game (and camera!) need to communicate what’s important at any given moment.
“For almost each scene we tried to create something we called the ‘sweet spot,'” says Igor Sarzyński. “[W]hich is this kind of staging of characters and elements and lighting in the frame that subconsciously makes you stand in a specific point.”
So rather than controlling the camera, nudging the player to stand in the right spot through careful stage construction leads to better framing. To a clearer signal.
“If [Jackie] leans towards us, we have close-up suddenly. If he gets up and walks away, we have something more. So we can play a lot with the content that we have, even though the player might not understand what happened,” says Pawel Ochocki. “[The player] wanted to sit down, because the game presented the option to sit down as the most attractive part of the conversation.”

What’s noise and what’s signal may seem clearer in a narrative game than in a more gameplay-focused one. But even in competitive games, separating noise from signal is crucial. A camera’s job in cinematography is to convey information–to tell a story. Too often in game development, we confuse story for words, but the whole idea of cinematography is to show, don’t tell.
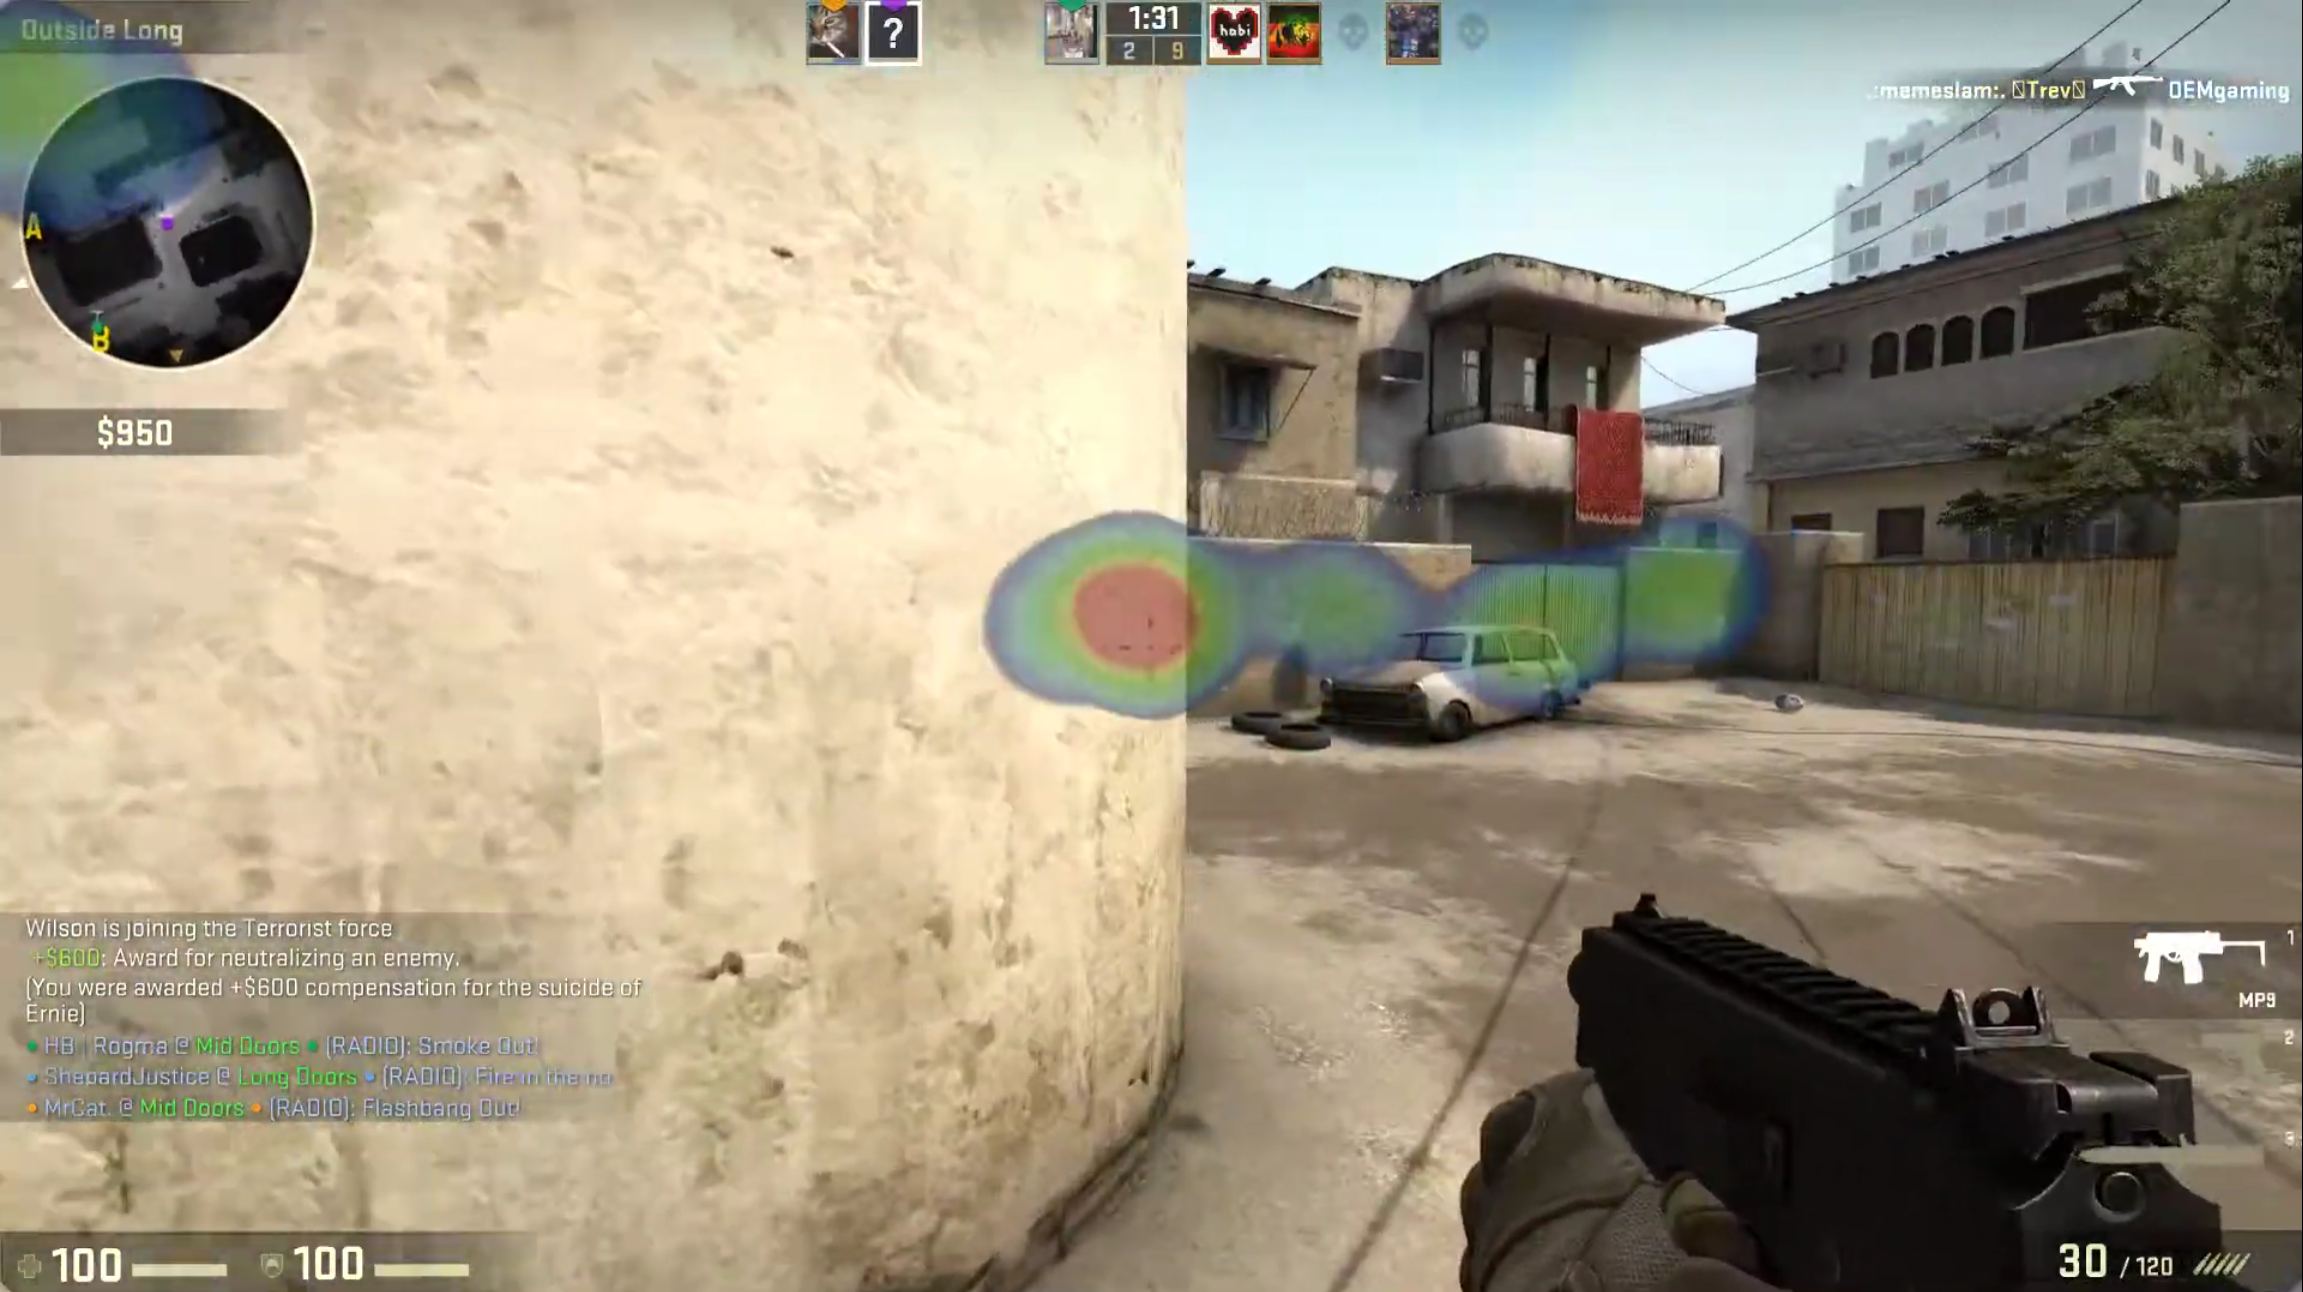
Using technologies like the Tobii eye-tracker to check screen coverage or even generate gaze plots, you can find out where players tend to look. One thing you’ll quickly see is that they “lead” with their eyes, looking slightly forward of the center of the screen when they are moving the character.
Something that’s also curious, and I’d personally flag as “noise” if it wasn’t such a ubiquitous first-person shooter staple, is the flicking of the gaze towards the corners of the screen to fetch important information like ammunition and health. This feels like a pre-widescreen artifact, where today it would make much more sense to simply put key information near the center of the screen.
Experiential Awareness
Pawel and Igor talk about where players naturally place their attention. How players want to go where the best content is. Where things are happening. This is something we often make use of in game design in the form of breadcrumbing, whether using enemies for the player to kill to lead you where to go next, or dabs of yellow paint, or treasures, or something else.
When characters in the game’s virtual world sit down, walk away, or enter closed spaces in Cyberpunk 2077, this is a carefully directed staging that’s merging narration with gameplay. It’s suggesting where the player should put their attention rather than controlling it. Most of the time, the player follows along.
“Players usually want the most attractive content you can provide them with,” Igor Sarzyński explains. “You could just turn around, go away, and come back in two months, but it turns out no one does this ever.”
I just have to point out that, yes, some players do this sometimes, and I’m one of them. But that’s beside the point, since having more freedom will always be one of my desires in games and I like testing how a game handles it when I make weird choices. The interesting takeaway here is to adapt things subtly to guide the player, and not to take control, because most players are predisposed to doing what they should do.

(Though in this specific case, you’re locked in place.)
What the first-person interactive cinematography means in this context is that you can move the content around the player in order to get the desired composition, and use interaction angles and distances to make sure that the player is in the right spot.
This is where we reach a point where camera work also intersects game development in more traditional forms. Diablo III‘s art direction layers separate the player from UI, enemies, and effects in an effective way using color saturation and mesh shapes. Thief: The Dark Project has desireable loot blink tantalizingly when they’re on your screen to guide your thieving eyes.
Characters
In an interview with George Lucas right after his life’s work was purchased by Disney, he commented on the many copycats that followed the success of the first Star Wars film. Where they failed, he said, was by simply copying the trappings of the film but forgetting to add characters that were interesting. They had spaceships and hyperdrives, but no Han Solos or Princess Leias.
“We are hardwired towards empathy,” is how Pawel Ochocki phrases the same thing. “We want the connection between people.” Because of this, “A lot of our work is about characters. About those tiny reactions and interactions that go into conversations between people.”
It’s about characters behaving believably, with branching activities and reasonable reactions to the player’s actions, without the game feeling like a cinematic. “You never see the branching,” says Igor Sarzyński about the heist scene in Cyberpunk 2077. “People go into the restaurant, Jackie goes upstairs. People who go directly to the elevator, Jackie goes with them.”
It’s reacting to player actions. It’s responsive empathy, not passive empathy. It also consciously reminds you who you are, by providing enough freedom for the camera to move that you can always see your body. To remind you that you have a body, that you’re part of the world.
Whether the characters on your screen are talking, flinching under fire, proposing toasts to Night City, or they’re just bugs crawling across the level in Killbug, they need to behave in ways that helps convey information and compose the frame. To separate signal from noise.

Final Notes on Cinematography
What Cyberpunk 2077 pulls off is incredible. It has some serious issues–not least of all the work intensity required to make it happen–but it does demonstrate that there’s a lot left to explore with first-person cameras. Turning lights on or off dynamically. Having characters wave to you or comment on what you do to ask for your attention. Leaning in. Taking a step away to light a cigarette, while someone else gets the spotlight. Making sure that the colors of the background and the colors of the characters don’t aim for realism but for clarity in framing and composition. Doing away with the idea of simulating a realistic camera, and instead pushing for clarity through gameplay.
You should walk away from cinematography with a whole host of good information, on noise vs signal, on focusing on who is in your frame, but also an important distinction. With a first-person camera, the player is always in charge, and the camera’s job is to give them the right information at the right time.

just as relevant for a game like Killbug, as for Cyberpunk 2077.
What a Game Camera Is
Next up is what a camera actually is, from a game engine’s perspective. This is important for many reasons, not least of all to make sure that we don’t do confusing things.
Transform Matrices
The camera exists somewhere in the simulated world and the world transform of the camera stores the matrix of location, rotation, and scale that lets you do all the three-dimensional mathematics that makes your game happen. This transform is also used whenever you need something to follow the camera for any reason. Maybe a world space HUD that acknowledges the camera’s facing, or your airplane cockpit model.
Game engines also provide ways for parenting transforms to create more or less complex hierarchies, where changes will propagate from parents to children. Because a camera requires fine-grained control in multiple layers, this is extremely relevant. It’s not unusual to use one transform to provide the location and another to provide rotation, for example. But we’ll make more mixed use of it, as you’ll see in the pseudocode later.
FOV, Clipping Planes, Frustum, and Viewport
A camera in a 3D game has a number of properties that determine how it renders a frame. We’ll only look at the basics, since this segue is already long enough.
First of all, you have the Field of View, or FOV. This is the angle between the center forward axis (the line of sight) and the edges of a theoretical view cone. A “realistic” FOV is somewhere around 200-220 degrees, taking the full range of human eyesight into account; including peripheral vision. But games played on flat screens look weird when rendered at this FOV. For games you can calculate the mathematically correct FOV based on the placement of your eyes in relation to the screen (refer to the illustration below). Taking this into account, a FOV around 85-110 for PC games where you usually sit closer to the screen, and 55-75 when playing on consoles, accurately represents what your screen as a window into the 3D world should show you. This says nothing about personal preferences, of course. You do you. But choice of FOV affects a lot more than how much you see. It also affects your sense of scale in the 3D environment.
Next, we use two clipping planes: the near clipping plane and the far clipping plane. In a 3D engine, this is the start and end point where any rendering happens. Beyond the far clipping plane, and in front of the near clipping plane, nothing gets rendered. In some first-person games, if certain objects come close enough to the camera you will start seeing “through” them. This is because the geometry intersects the near clipping plane and stops being rendered, making it look cut up. For this reason, you usually make the collision handling for your first-person character wide enough so that nothing will ever intersect the camera’s near clipping plane.
The volume between the two clipping planes (or, technically, the six clipping planes; top, left, right, and bottom are also “clipping planes”) is the view frustum. Most 3D rendering will use this frustum to determine what should be made visible on-screen. If everything was rendered all the time, something like a large open world or really detailed level would become too computationally expensive. What happens instead is that anything that’s not intersecting the view frustum gets “culled,” which is programmer speak for not being rendered.
With all that in mind, the final screen render happens in your viewport, which is your visual interface into the 3D world. The viewport can tell you whether something is on-screen as opposed to being rendered. The viewport’s coordinates are handled in screen space (X,Y), rather than world space (X,Y,Z). A conversion that may sometimes be relevant to make in gameplay, as well. For example, when using your mouse to make a box selection in a strategy game, you do this in screen space, but the units are selected in world space.

Finally: A Systemic Camera
It’s time to make the camera! We’ll take all of the aforementioned things into account and start simple. Whether you call it a manager, controller, handler, director, or something else, you will need some generic way to handle the whole camera hierarchy and all its pieces. There will only be one camera, so the singleton pattern is a good match.
Transform Hierarchy
First thing’s first. Putting the camera into the virtual world. To be able to filter the different parts of the camera’s behaviors, both for gameplay design reasons and for accessibility reasons, we need a certain hierarchy in place.
Transforms update from parent to child, meaning that a higher transform in a hierarchy has a higher authority; but also that children can override the shenanigans of their parent. (Which sounds an awful lot like real-life parenting.)
This is the hierarchy we will use:
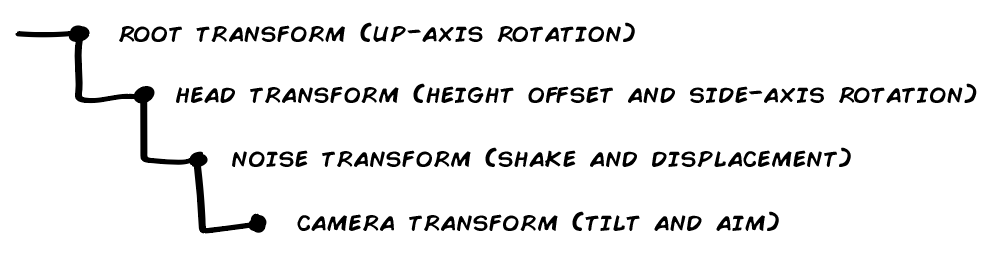
First, we have the root transform. This is the world space transform of the player’s avatar. Character, mecha, floating camera; whatever you’re playing. The root transform’s only job from the camera’s perspective is to move and to turn on the up-axis (looking left/right). Whenever the root transform does this, all of the children will follow along. Do note that it only turns on the up-axis–it respects axis alignment. If this transform would rotate, the whole hierarchy would rotate with it. You may want this if you have a game where you can walk on walls for example, but it’s generally quite disorienting.
Second, we have the head transform. This follows the root transform with an offset, to get the right head height, and then adds side-axis rotation (looking up/down). It does this respecting whatever constraints your game has. Some games clamp rotation to the full 180-degree spectrum (-90 or +90 from forward); other games use narrower clamping; and others yet again allow full six-degree freedom. In the last case, think of classics like Descent. Anything that needs to follow a stable direction or the camera’s unmodified location can safely follow this transform. A draw view model, for example. You can also move this transform’s height offset to represent crouching, crawling, and so on.
Third, the noise transform has a very specific job to do: adding noise. This noise is only applied to the location, however. Things like displacement and camera shake are applied here. We won’t rotate this transform. This transform is separated from its parent because of instances where you don’t want some elements to be affected by noise at all (like the previously mentioned draw view model). But for anything you want to be affected by noise, this is the transform to use. Naturally, if you don’t want any noise in your game, this transform can be removed.
Fourth and final, the camera transform. The camera object’s transform. This handles tilt on its own forward axis, and it can also provide features like aim retention and other potential overrides or tweaks to the movement and rotation of its parent hierarchy. The main reason to keep the camera’s own transform at the bottom of the hierarchy is to be able to affect viewport changes directly without having to go through the whole hierarchy, and to make those have the final say. By turning tilt off, you will enforce planar alignment–tilting is the only exception to horizontal alignment in this setup.
public class CameraController
{
private:
    Transform tRoot;
    Transform tHead;
    Transform tNoise;
    Transform tCamera;
    Transform tTarget;

    Camera camera;

    Vector2 vLookLimits = Vector2(-90.f, 90.f);

    float fLookSpeed;
    float fTurnSpeed;

    Quaternion qOrigin;

    float fOriginalFOV;
    float fCurrentFOV;

    float fLook;

public:
    bool bAimRetention;
    bool bAllowTilt;
    bool bAllowShake;
    bool bAllowDisplacement;

    // Hooked up to your mouse move delta
    void OnLook(Vector2 a)
    {
        // Apply up-axis rotation directly
        // Apply side-axis rotation clamped by look limits
    }
}
Move
Movement only affects the root transform’s planar axes. In Unity, this would be your Z and X axes. In Unreal, it’d be X and Y. Not much to it. This isn’t technically camera-related either–it’s movement.
Rotate
Rotation is split into two separate parts. The character’s up-axis (side) rotation and the camera’s side-axis (vertical) rotation. For the first, it’s handled by the root transform, since it will affect the whole hierarchy, including the facing of the camera. The second is handled by the head transform.
Horizontal rotation, on the root transform:
// Apply up-axis rotation directly
auto rotation = (a.x * fTurnSpeed) * deltaTime;
tRoot.Rotate(Vector3::Up, rotation);
Vertical rotation, on the head transform:
// Apply side-axis rotation clamped by look limits
fLook += (a.y * fLookSpeed) * deltaTime;
fLook = Clamp(look, vLookLimits.x, vLookLimits.y);

tHead.localRotation = Quat::OnAxis(Vector3::Right, fLook) * qOrigin;
Camera Behaviors
Since you’ll want the camera’s various things to be additive in nature, we can refer to a tried and true technique for adding combined influences: behaviors. Just like Reynolds’ eminent steering behaviors, we want to be able to stack a bunch of things together that will then affect the camera cumulatively over time.
If a huge explosion causes camera shake, for example, and you then take a punch to the face, you’d want the punch to add a little bit more shake (and insult) to that explosion.
Note that there are some flag checks here causing early returns if you don’t want some effects. This is probably not the right way to do it–just an illustration. You’re better off stripping out options entirely, so that Tilt, for a player who doesn’t want it, never gets added in the first place. The only drawback to that is if you can change those options at runtime, which would mean only future tilt behaviors would happen, since there’s then no behavior to do an early return from.
As always with implementation details, you do you.
public class BaseCameraBehavior
{
protected:
    float fDuration;
    float fTime;
    Vector2 vForce;

public:
    BaseCameraBehavior(Vector2 force, float time)
    {
        fTime = fDuration = time;
        vForce = force;
    }

    void Calculate(Vector2 translation, Quat rotation, float fov)
    {
        // Do stuff with things. Also make sure to time -= deltaTime.
    }

    float RemainingTime()
    {
        return time / duration;
    }
}
Also note that the CameraController will need ways to work with these behaviors:
auto totalForce = Vector2::ZeroVector;
auto totalRotation = Quat::Identity;
auto totalFOV = 0.f;
auto trashList = Array<BaseCameraBehavior>();

// Check all the behaviors
foreach(behavior in cameraBehaviors)
{
    if(behavior.RemainingTime > 0)
    {
        Vector2 translation;
        Quat rotation;
        float fov;

        behavior.Calculate(&translation, &rotation, &fov);

        totalForce += translation;
        totalRotation *= rotation;
        totalFOV = fov;
    }
    else
    {
        trashList.Add(behavior);
    }
}

// Retire completed behaviors
if(trashList.Num() > 0)
{
    foreach(behavior in trashList)
        cameraBehaviors.Remove(behavior);
}

// Apply shake and displacement effects
tNoise.localPosition = Vector3(totalForce.x, totalForce.y, 0);

// Apply tilt
tCamera.localRotation = totalRotation * origin;

// Apply zoom
if (totalFOV != 0f)
{
    currentFOV = totalFOV;
    camera.SetFOV(currentFOV);
}
Shake
You’ve seen camera shake of all its kinds, of course. They are designed to rock your world. Simply using remaining time as a multiplier will make the shaking stop at fDuration. If you want the shake to reflect external forces, you can instead use a direction vector that you combine with random noise and weight based on the amount of force.
public class CameraShake : public BaseCameraBehavior
{
private:
    Vector2 vShake;

public:
    void Calculate(Vector2 translation, Quat rotation, float fov) override
    {
        if (fTime > 0)
        {
            fTime -= deltaTime;

            if(!CameraController.Instance.bAllowShake)
                return;

            vShake= Random::UnitVector * RemainingTime();
        }

        translation = vShake;
    }
}
Displacement
When you land on the ground from a high drop or you take a solid hit from an enemy attack, it can give a nice effect to displace the camera from its origin and blend it back into position. No rotation happens–we only manipulate the noise transform’s local position.
This pseudoimplementation is primitive. Simply divide the duration into an outward blend and a back blend and do them one at a time. When both have run their course, you’ve reached the original full duration.
public class CameraDisplacement : public BaseCameraBehavior
{
private:
    float fOutTime;

public:
    CameraDisplacement(Vector2 force, float time)
    {
        fTime /= 2f;
        fOutTime = fTime;
        fDuration /= 2f;
    }

    void Calculate(Vector2 translation, Quat rotation, float fov) override
    {
        if(outTime > 0)
        {
            fOutTime -= deltaTime;

            if(!CameraController.Instance.bAllowDisplacement)
                return;

            auto value = fOutTime / duration;
            translation = Vector::Lerp(force, Vector2::Zero, value);
            return;
        }

        if (time > 0)
        {
            time -= Time.deltaTime;

            if(!CameraController.Instance.bAllowDisplacement)
                return;

            auto value = RemainingTime();
            translation = Vector::Lerp(Vector2::Zero, force, value);
       }
    }
}
Tilt
This is the only feature in this whole mess that disrespects planar alignment. If you have tilt in your game, you should make sure to provide accessibility features for turning it off.
public class CameraTilt : public BaseCameraBehavior
{
private:
    float fOutTime;

public:
    CameraTilt(Vector2 force, float time)
    {
        fTime /= 2f;
        fOutTime = fTime;
        fDuration /= 2f;
    }

    void Calculate(Vector2 translation, Quat rotation, float fov) override
    {
        auto b = Quat::OnAxis(-force.x * 45f, Vector3::Forward);

        if (fOutTime> 0)
        {
            fOutTime-= Time.deltaTime;

            if(!CameraController.Instance.bAllowTilt)
                return;

            rotation = Quat::Lerp(b, Quat::Identity, fOutTime/ duration);
            return;
        }

        if (time > 0)
        {
            fTime -= Time.deltaTime;

            if(!CameraController.Instance.bAllowTilt)
                return;

            rotation = Quat::Lerp(Quat::Identity, b, RemainingTime());
        }
   }
}
Zoom
An interesting thing with how FOV works is that you can narrow the FOV angle of the camera and you’re effectively zooming in. This is the only operation we’re talking about here that is a setting on the game engine’s camera and not manipulating the transform hierarchy in some way.
public class CameraZoom : public BaseCameraBehavior
{
private:
    float fFrom;
    float fTo;

public:
    CameraZoom(Vector2 force, float time)
    {
        to = CameraController.Instance.CurrentFOV;
        from = CameraController.Instance.OriginalFOV + force.x;
    }

    void Calculate(Vector2 translation, Quaternion rotation, float fov) override
    {
        if(fTime > 0)
        {
            fTime -= Time.deltaTime;
            auto lerp = float::Lerp(from, to, RemainingTime());
            fov = lerp;
        }
    }
}
Aim Retention
One thing that can be both nauseating for some and simply frustrating for others is when noise or animation affects your aim. Aim retention makes sure that the center of the screen stays locked even when displacement, shake, and other noise is affecting the camera.
Just make sure to point the camera at its target after everything else has had a chance to happen.
if (bAimRetention)
{
    auto direction = tTarget.position - tCamera.position;
    tCamera.forward = direction.Normalize();
}
Data-Driven Camera Events
Behaviors are nice and all, but it gets tedious to have to send a whole bunch of them every time we want some kind of compound camera effect. Enter the CameraEvent.
CameraEvent incorporates a simplified timeline, allowing us to schedule camera behaviors. We can then construct these events beforehand and send a whole bundle of behaviors to the camera instead of having to send individual pieces. This makes it more data-driven, as opposed to hard-coded, which is a fundamental principle in systemic design. It means we can author as many camera events as we want using our editor of choice, without writing code, and then get the right ones to the camera once push comes to shove.
In other words, it means designers can make camera events for us.
public struct BehaviorTick
{
    BaseCameraBehavior Behavior;
    Vector2 vInput;
    float fDuration;
    float fTime;
}
public struct CameraEvent
{
Array<BehaviorTick> TimeLine;
AddTick(BehaviorTick newTick)
{
// 1. Add the new behavior tick to TimeLine
// 2. Sort the timeline in ascending order by fTime
}
}This is actually all we need to make the magic happen.
Each behavior we want to insert into the camera event needs its data, duration, and at which time in the timeline it should start. There are also some other, optional, mechanics, like having a camera event loop or hand over control to another event. It’s also handy to be able to loop events, for example the head bobbing event below, externally from the simple array of behaviors.
What you can do is that you can keep a stack of camera events that will take priority, for any events that are persistent, and then run and complete camera events as they come in for events that are strictly for effect. But let’s skip that “fancy” stuff for now–extensibility is one of the main points of designs like this. Your game will dictate what you actually need, when, and how.
Hit to the Head
This event could happen when someone hits you in the head, Condemned: Criminal Origins-style.
- CameraDisplacement: start at 0, duration of 1 second, use direction of incoming hit as input.
- CameraShake: start at 0, duration of .75 of a second, also use direction of incoming hit. This means the shake fades out by the time the return from the full displacement is half-done.
Leanout
A classic staple of many immersive sims and adjacent games: leaning around corners to get a glimpse of your dark future.
- CameraDisplacement: start at 0, lasts for 1.5 seconds (roundtrip), but pauses at .75 until player stops pressing button, uses direction of button press to determine direction.
- CameraZoom: starts at .25, lasts for 1 second. Pauses at .5 until player stops pressing button. Just a slight “zoom” when at full extension around the corner. Could be tied to what you have in your hands as well. Maybe you zoom with a bow or gun, but don’t zoom by default.
Force Landing
After dropping down from something high and landing hard, this is a classic.
- CameraDisplacement: start at 0, lasts for 1 second, uses world space down direction with the velocity from the landing used as a force multiplier.
- CameraShake: starts at 0, lasts for .5 of a second, and uses a fraction of the velocity from the landing as shake force.
Head Bobbing
This can be done in some different ways, but an easy way is to simply use tilt and to alternate it back and forth between the two sides. Note that this means a player who doesn’t want tilt won’t get any head bobbing either.
- CameraTilt: starts to one direction at 0, lasting for .5 of a second.
- CameraTilt: starts in the other direction at .5, lasting for .5 of a second. Then loops back.
Acceleration Tilt
Slightly tilting the camera based on movement acceleration is a common effect you can use in this way, but would be a constant effect that’s not pushed and popped continuously.
- CameraTilt: starts at 0, lasts for .25 of a second, and uses the player’s movement input relative to the camera to determine tilt amount.
Conclusions
Not sure there should be any broad-scope conclusions to draw from this. First-person cameras are really cool, and we’ve still only scratched the surface. This was the first of three articles over the span of the coming months, until I’ve managed to cover all of the systemic 3Cs for first-person games.
Brace yourself, for there will be plenty more to disagree with!
Continue in the post on Controls.

6 thoughts on “First-Person 3Cs: Camera”