That’s a lot of history and not a lot of substance. Systemic design requires substance (though we can argue whether it requires gamification). Let’s go through som pseudocode that turns all the nonsense in the previous post into practice.
Note that there are many different styles of best practice around these subjects. It also varies which numbers you may want to tweak and how you want to work with them. As always, there’s no one size that fits all.
Also as always, if you disagree or you want to discuss these subjects with yours truly, do so via annander@gmail.com.
Scope
For any gamification design, you need to consider who the gamification is relevant for. The two standard variations are that the gamification is for the player or for the player’s avatar. It’s not uncommon for games to incorporate both layers of gamification, for example having achievements for the player and experience levels for the player’s currently selected character.
Very few games treat the gamification as a diegetic layer, however. There is no in-world reasoning behind levelling up or gaining achievements. It’s purely in the realm of the “gamey,” even if some games may refer to levelling up semi-diegetically through tutorial dialogue.
Player
In the first case, gamification is global and tied to the game itself. To do this persistently, you may need some type of backend, even if that backend simply amounts to the Steam API or other platform layer that does most of the work for you.
In a modern roguelike dynamic, this is the space where you unlock things between deaths. In a massively multiplayer setting, it’s the stuff tied to your account. Maybe your shared inventory slots and gold stash.
Avatar
In the second case, gamification is assigned to a specific avatar. It can be a dragon you breed in Dragonvale, or it can be your own instance of Geralt in your most recent playthrough of The Witcher 3: Wild Hunt. All of the experience point levels and unlocks are tied to this character. It’s still player-facing, but it’s tied to a specific avatar in the game world.
As previously discussed, some of this is about time investment. If you make a specific unlock for one character, that means you need to create a new character to make another specific unlock, pushing you to spend more time with the game.
This doesn’t have to be a character necessarily. You can put this style of gamification on a piece of gear, vehicle, or anything else. All it means is that it’s tied to a specific instance of something and not to a global scope.

Gamification Container
It doesn’t matter that much where you put the gamification, structurally. But anything that’s completely player-centered will usually be expected to be persistent and to count across any and all separate avatars, while avatar gamification is accepted to be restricted per avatar. These are not rules but rather established design tropes that many players are likely to expect.
If you want to put a container on each magical weapon, game vendor, and island city, then that’s entirely up to you. There are guaranteed to be many interesting and unique ways to make use of gamification that we haven’t seen yet, and it may start as simple as putting this container where it’s not usually placed.
Imagine a container something like this:
class GamificationContainer : public IPersistentObject
{
  // The experience system itself (see later)
  ExperienceSystem* pExperienceSystem;

  // Any systems that care about experience can be handled as listeners or observers.
  Array<ExperienceListener*> ExperienceListeners;

public:
  // Add or remove listeners.
  void AddListener(ExperienceListener* NewListener);
  void RemoveListener(ExperienceListener* Listener);

  // Persistent object things; saved to your profile backend or local save file as appropriate.
  void Save()
  {
    // Store the state of the experience system (total XP).
    // Store the state of all listeners.
  }

  void Load()
  {
    // Restore whatever you saved in Save().
  }
}
And then the ExperienceListener could be something like this:
class ExperienceListener
{
  ExperienceSystem* ExperienceSystem;

protected:
  // Anything inheriting from ExperienceListener will use this
  virtual void OnLevelUp(const int32 NewLevel) = 0;

public:
  ExperienceListener(const ExperienceSystem* System)
  {
    ExperienceSystem = System;
  }

  void Activate()
  {
    // Subscribe to the ExperienceSystem's OnLevelUp.
  }

  void Deactivate()
  {
    // Unsubscribe from ExperienceSystem's OnLevelUp.
  }
}
This setup is enough to cover most possible use cases tied to experience leveling. None of this needs to be complicated.
Basic Experience System
Next up: the system for accumulating experience and gaining levels. The simplest form of this uses a linear function. We’ll use the function XP = Y * L * (L + 1), where XP is the required amount of experience points needed to reach the next level, Y is a baseline number used to scale the system and its rewards, and L is the current level of the entity accumulating experience. You can use any function you want, your engine’s curve interpolation variable, or something else. This specific formula is borrowed from the third edition of Dungeons & Dragons.
I really like having some variables as assets on disk that can be accessed externally from runtime objects. In Unreal, this would be your UDataAsset; in Unity it would be a ScriptableObject. Particularly baseline values benefit greatly from this approach, since you can access them without having to chase for the specific objects where they are tied into the systems.
Some developers prefer to use comma-separated values (CSVs) and collect them in spreadsheets that can export them handily. But as with everything in development, how you construct your process is up to you.
Imagine that we have an interface that lets us store and tweak variables on disk (CSV origin or not):
struct IntVariable : public ITweakableAsset
{
    int32 Value;
};
Then the actual experience system can look something like this:
class ExperienceSystem
{
    // Total XP is used to calculate your current level on return
    int32 iTotalXP;

    // Current experience level
    int32 iCurrentLevel;

    // Current experience accumulation, since last level up
    // Zeroed when you gain a level
    int32 iCurrentXP;

    // Temporarily stores xp that you just gained
    int32 iXPGain;

    void CheckLevelUp()
    {
        auto bDidLevelUp = false;

        if (iXPGain > 0)
        {
            auto xpcalc = iCurrentXP + xpGain;

            if (xpcalc >= TargetXP(iCurrentLevel))
            {
                while (xpcalc >= TargetXP(iCurrentLevel))
                {
                    iCurrentXP = xpcalc - TargetXP(iCurrentLevel);
                    ++iCurrentLevel;

                    // Tell any observers that you levelled up
                    OnLevelUp->Broadcast(iCurrentLevel);
                }

                bDidLevelUp = true;
            }
            else
            {
                iCurrentXP += iXPGain;
            }

            iTotalXP += iXPGain;
            iXPGain = 0;
        }

        return bDidLevelUp;
    };

    int32 TargetXP(int32 Level)
    {
        return XPBaseLine.Value * Level * (Level + 1);
    }

    void CalcCurrentLevel()
    {
        auto xpcalc = iTotalXP;
        auto CurrentCalc = xpcalc;

        while (xpcalc >= TargetXP(currentLevel))
        {
            CurrentCalc -= TargetXP(currentLevel);
            ++iCurrentLevel;
        }

        iCurrentXP = CurrentCalc;
    }

public:
    FLevelUpSignature* OnLevelUp;

    IntVariable XPBaseLine;

    // For displaying progression
    float GetNormalized()
    {
         return (float)iCurrentXP / TargetXP(iCurrentLevel);
    }

    // For any addition of xp
    bool AddXP(int32 XP)
    {
        iXPGain += XP;
        return CheckLevelUp();
    };
};
Awarding Experience
The neat thing about this system is that the baseline and level already provide a standardised reward structure out of the box. Rather than awarding experience arbitrarily, you can award it as some multiple of the baseline.
Let’s say that we use the Dungeons & Dragons third edition baseline, which is 500. This means that XP = 500 * level * (level + 1). At level 5, you therefore need to have accumulated 15,000 xp to hit level 6. This means you need to gain 5,000 experience points above what you needed to reach level 5 from level 4.
Using this knowledge, we can set up rewards that only use the baseline and nothing else:
- Easy award is worth a tenth of the baseline: 50 xp. 100 awards required to reach level 6 from level 5.
- Medium award is worth a quarter of the baseline: 125 xp. 40 required for level 6.
- Hard award is worth half the baseline: 250 xp. 20 of these required.
- Milestone award, same as the baseline: 500 xp. 10 of these required.
If we also multiply these award tiers by current level, we get a simple style of scaling:
- Easy award becomes 250 xp at level 5. You need 20 to go from level 5 to level 6.
- Medium award becomes 625 xp. You need 8.
- Hard award is worth half the baseline: 1,250 xp. You need 4.
- Milestone award: 2,500 xp. You need just 2.
Of course, we can easily do this the other way too—by dividing the award further by current level. This could become relevant if we don’t want players to “farm” low-level enemies for easy xp, for example. Or if we don’t want our game to feel the same at each level. The easiest way to do that is to factor in the level of the opposition. For example, by dividing the lower level by the higher and then using the result as a multiplier on the final award.
For example, if your level 10 murder hobo delivers the deathblow to some lowly level 6 kobold, this would yield just 60% of the award (6/10). If that kobold was then easy to begin with, the resulting math would look like this:
With scaling, (50 * 10 = 500) * 0.6 = 300. Or, if you scale using the opposition’s level instead, which probably makes more sense; (50 * 6 = 300) * 0.6 = 180.
Without scaling, 50 * 0.6 = 30.
Scaling at all is of course a matter of taste. Some players strongly dislike level scaling; other players enjoy the consistency it can provide. Some games apply scaling across everything, while others may scale some encounters but not others. Say, scale encounters in the wild, but keep dungeons or milestones without scaling. You do you. These are just the dials you can choose to turn.
Specific Experience
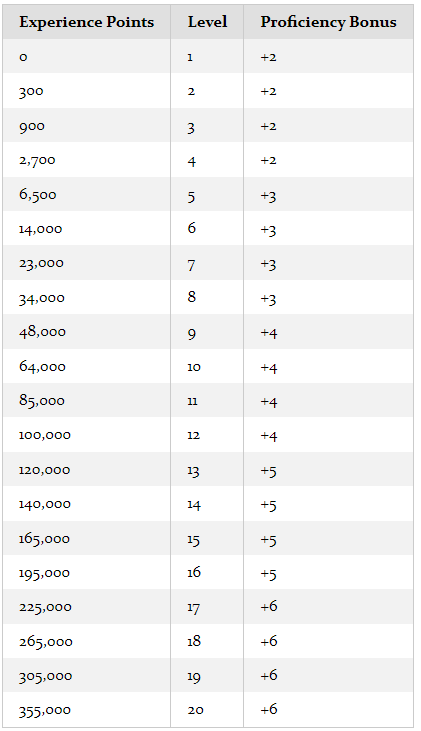
Another variant is to specify the xp numbers for each level in a table. That way, you can get more satisfying power scaling for the player and you can more carefully gate the features that the player gets access to. Personally, I quite like using a function because it means there’s no practical level cap unless I set one manually.
A table requires that you specify the flow of levels manually. Of course, nothing stops you from using a function to calculate the numbers you’re putting into the table, but it’s not as neat and not as easy to tweak.
One example of the table-based approach is the fifth edition of Dungeons & Dragons, where the experience point requirements start at 300 and multiplies by three for the first couple of levels, before decreasing slightly. For most of the game’s character classes, the player is making a significant choice at third level, making this change noticeable for the player. They can learn the new features of their class gradually and will then be able to put them to good use at their own pace. There are strengths to both approaches.
Level-Based Unlocks
We already have the OnLevelUp provider tell us when a level was gained. This means that we can set up observers to easily make things happen on level up. Level-based unlocks is the most straightforward example, but will usually need a data-driven way to figure out boundaries.
In the following example, it’s manually added in the code, which isn’t great if you don’t use some kind of externally parsed scripting language:
class FighterUnlocks : public ExperienceListener
{
  struct Unlock
  {
    int32 Level;
    void* Ability;

    Unlock(int32 UnlockedAtLevel, void* UnlockedAbility)
    {
       Level = UnlockedAtLevel;
       Ability = UnlockedAbility;
    }

    // Does whatever "unlocking" means in your system.
    void Unlock();
  }

  Array<Unlock> LevelUnlocks
  {
    new Unlock(1, new ClassAbility()),
    new Unlock(3, new SpecialAbility()),
    new Unlock(5, new SuperAbility()),
    new Unlock(10, new GodlikeAbility()),
    new Unlock(15, new AbsurdAbility()),
    new Unlock(30, new GameCrashingAbility()),
    new Unlock(50, new DesignerImaginationRunsOutAbility())
  }

protected:
  virtual void OnLevelUp(const int32 NewLevel) override
  {
    for(const auto Entry : LevelUnlocks)
    {
      if(NewLevel <= Entry.Level)
        Entry.Unlock();
    }
  }
}
Dealing With Numbers
Bret Victor said in a talk I didn’t manage to find again on YouTube, “show the data; show comparisons.” In any UI design with numbers, you need to know what’s going on, and you need to be able to compare the outcome of different choices.
Since gamification is largely mathematical, this is crucial for any game with gamification. It starts with how to represent the math to begin with.
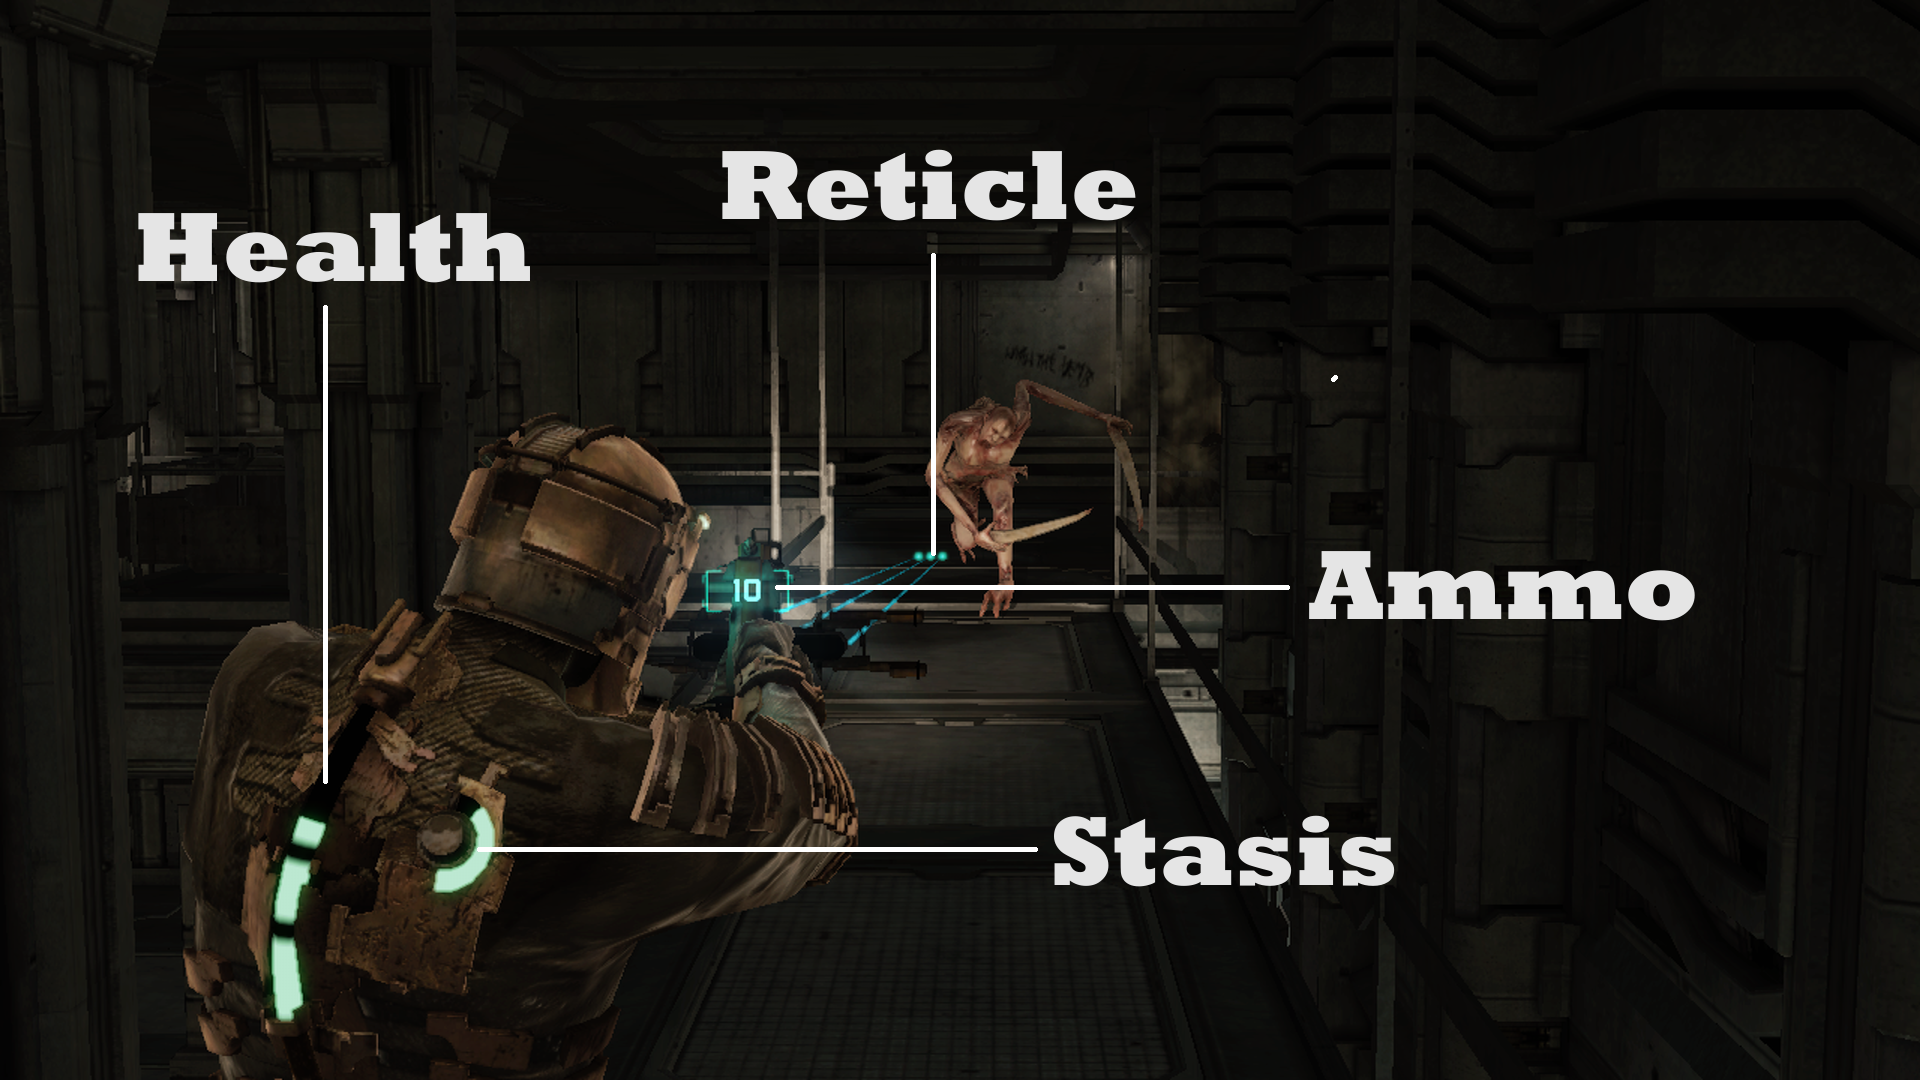
Displaying Numbers
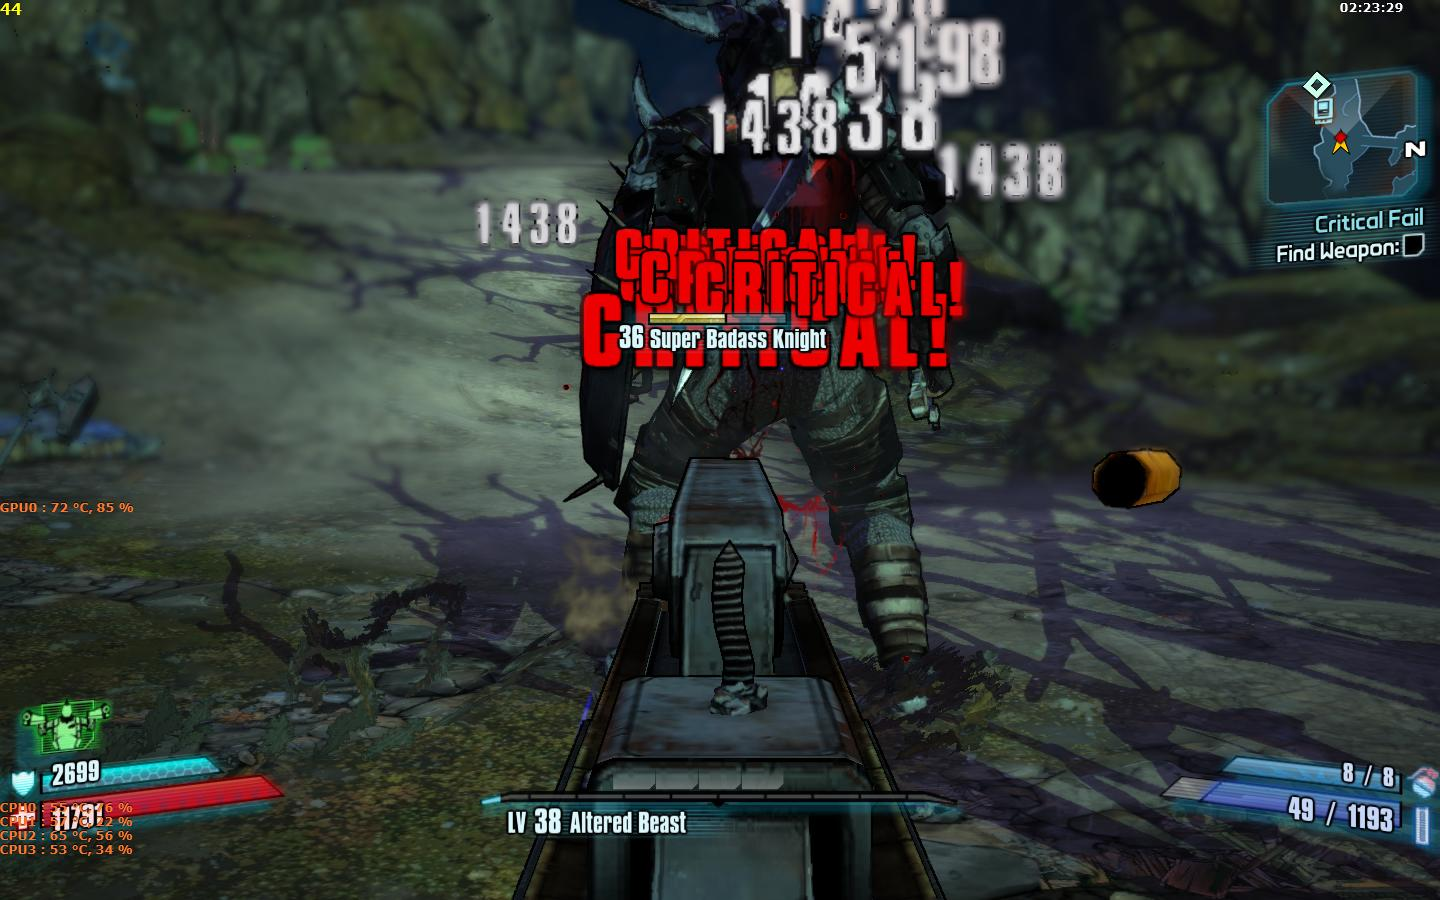
Many games put the numbers on the screen explicitly. When you hit an enemy in the head, a red number jumps out telling you exactly how many points of damage you did to that enemy. This combines style and information and works really well for some types of game. It’s also immediate feedback for any changes you’ve made to your gear or character build. If you see the numbers go up, you probably did something right.
Games often make a visual difference between regular hits, critical hits, various damage types, and other nuances. They may use color, type, font size, and many other tweakable elements to achieve this.
Comparing Numbers
There are essentially three schools of thought when it comes to representing the numbers in a game. Then there are infinite variations between them, of course, but if we look at it as three separate schools it’s easier to talk about.
We can call the first school the simulation school. This is where there’s no player-facing representation at all. You simply have to learn the difference between one material and another, the duration of burning between one wood type and the next, and so on. Some games will have whole wikis filled out with this data in no-time after launch. But keeping the numbers away from the player is a conscious decision in this type of game, often because it’s aiming more for immersion than number crunching.

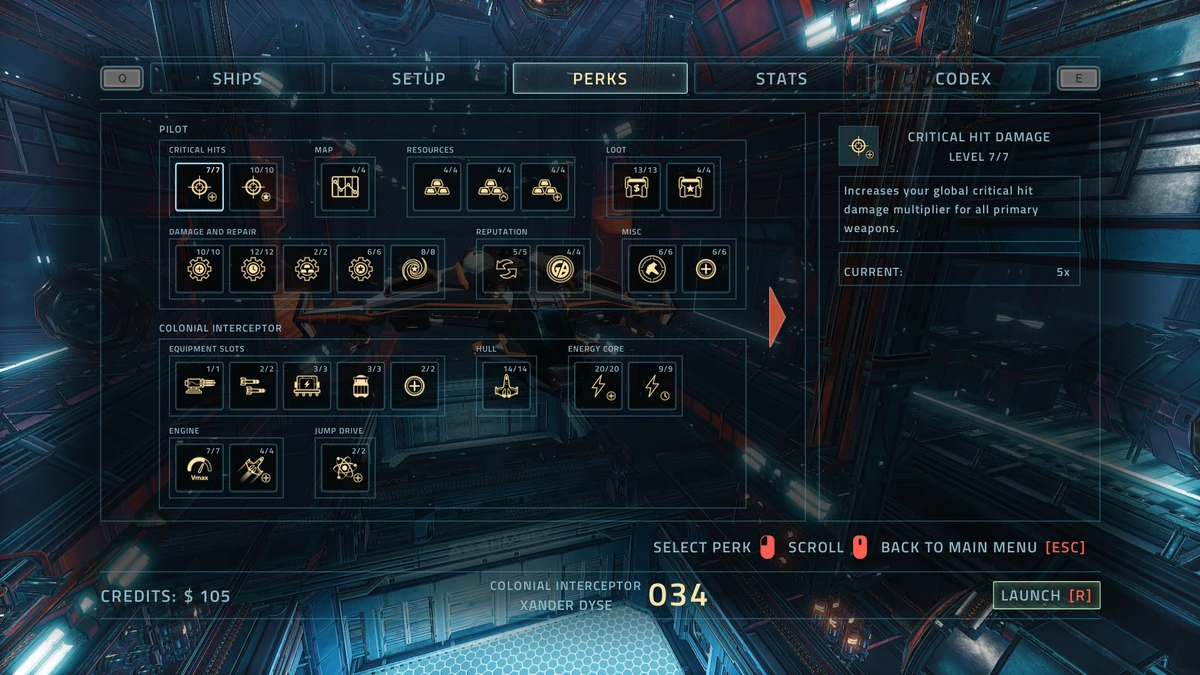
The next school we can call the utility school. It’s where you can see representative comparisons that try to boil down a tradeoff’s relative utility in the given moment. A good example is the Diablo III item comparisons that were introduced later in the game’s life cycle.
By showing you the difference in damage, toughness, healing, or even just green or red arrows based on which is statistically better overall, it means you won’t have to go into every single number in detail or crunch it in your head. You can see roughly what tactical difference the item will make from a glance and make a quick decision.
Of course, to truly master your build customisation you may have to go into the numbers anyway. But mastery isn’t everyone’s jam.

Thirdly, we have the spreadsheet school, where having perfect information on all the data that goes into and out of the game isn’t just important but absolutely essential to the game experience. Some games will require you to use actual spreadsheets by exporting their data as CSVs that you can import into your spreadsheet tool of choice. Others will provide all that information inside the game. Management games often belong to this school of thought.

Number Containers
Anything in your game can contain numbers. Having a generic way to handle those numbers is therefore a good thing. Whether you want to use templates or write specific code for each type of number management is of course dependent on the project—there’s no factual best practice here.
Personally, I prefer if a system can be as small as possible and then defined through data more as exceptions. In other words, a data-driven and exception-based design. (More on these things in the future.)
One way to achieve this is to define a type of data that’s common for anything that affects the same object, like a character’s stats:
struct CharacterStats : public ITweakableAsset
{
  int32 Strength;
  int32 Dexterity;
  int32 Constitution;
  int32 Wisdom;
  int32 Intelligence;
  int32 Charisma;

  // Operator overloads so a container can do things with stats
  ICharacterStats operator+(const CharacterStats& Other);
  ICharacterStats operator+=(const CharacterStats& Other);
  ICharacterStats operator-(const CharacterStats& Other);
  ICharacterStats operator-=(const CharacterStats& Other);
  ICharacterStats operator*(const CharacterStats& Other);
  ICharacterStats operator*=(const CharacterStats& Other);
};
This object can be turned into an asset on disk as well, for easier access and tweaking. In games that rely heavily on data management, decoupling assets from their objects is a good core principle.
On the character or other object that will then use these stats, you add a StatContainer that can own all of the data references depending on what they should do.
template<struct T>
class StatContainer
{
  Array<T> AddStats;
  Array<T> SubStats;
  Array<T> MulStats;

public:
  // Bundles all of the added interfaces together and returns total
  T GetTotal()
  {
    T Total = new T();

    // Addition first? Not mathematically accurate, but let's do it.
    for(const auto Add : AddStats)
      Total += Add;

    // Subtraction second? Vicious, but why not?
    for(const auto Sub : SubStats)
      Total -= Sub;

    // Cumulative multiplication? Wow ...
    for(const auto Mul : MulStats)
      Total *= Mul;

    return Total;
  }
}
This approach does have some disadvantages, however. You will probably end up having a lot of objects with zeroes in them. For example, the bracelet that provides a +10 Strength will have zeroes in the other five D&D attributes.
It makes most sense to do complete stat bundles for things like level up bonuses and other effects that do affect everything. For others, you can use the same line of thinking but provide a StatContainer for each individual stat instead of the whole stat-driven object. As you can tell from the above, this doesn’t really matter from the pseudocode’s perspective.
Baseline, Attributes, and Modifiers
Stat-driven games can quickly becomes unwieldy. We’re already talking about baseline, level, stats, modifiers, etc, and we’ve barely scratched the surface! Because of this veritable explosion of numbers, it helps to set up some terminology to work with in your team.
Personally, I really like to separate game system math into four parts.
- Baseline values can be used for broad rebalancing. Baseline jump height, damage, experience, etc. It’s the type of thing you can change when setting up different difficulties for example, or if you feel that enemies deal too much damage in broad terms.
- Attributes are per-object variables. Your character’s extra damage, or an individual enemy’s increased jump height. What’s important with attributes is that you try to avoid the phenomenon of the “dump stat,” which is the attribute no one cares about because it doesn’t affect the game enough. It’s equally important to avoid having a single attribute affect too much.
- Modifiers can be contextual, optional, customisable, or applied some other way. When you equip a new item or move around on the slippery ice, you’re applying modifiers.
- Lastly, Functions are how you actually make use of all the other numbers. It determines how you weight the value of baseline vs attribute, for example, and at what point you include modifiers in the calculation. It makes a pretty big difference if you add numbers together before multiplying or after, for example.

By decoupling numbers into these separate categories, you can structure your project and its balancing in a much clearer way. Whether you use external files or spreadsheets for all of these is of course more about taste. Functions are generally easier to put into code, but there may be instances where even they are turned into external objects for easy access.
Global Stats
You will often want to keep track of global statistics that are also tied to an account or avatar. Things like total number of kills, total time played, and so on. This is easily implemented with the same reasoning—just add StatContainer that bundles all the relevant information together and is updated from whichever events you may need.
Such a StatContainer can also have an internal checklist for whenever a stat changes where you can check achievement unlocks and other high level changes. For example, whenever a kill is scored and an event is sent, this global StatContainer could unlock the 100,000 kills achievement if you just hit 100,000.
Player-Facing or Not
We now have the number containers and we’ve separated them for easier development. But one thing still remains, even though we already talked briefly about displaying numbers earlier: which numbers are player-facing?
There are many different schools around this, and though many games will allow you to indirectly change the baseline damage and health numbers through your choice of difficulty, some games expose everything about the underlying numbers.
Personally, I prefer more immersive systemic games, and they rarely put numbers up front. But there’s a decision here that you need to make for all of your own designs.

Rules
Which numbers you want in your game is a giant undertaking to figure out. But it gets really complex when it gets to the Functions column of the previously used table. I will go through some of the considerations you will have to make setting up rules for your gamification math. But this is merely scratching the surface.
Point Spending
Any system where you want the player to spend points must make a number of important decisions from early on.
- Points can be player-facing—which is very common—where you get X number of actual points and you spend them on various costs. Maybe the first unlock costs 1, second costs 2, etc. But points can also be abstracted, so that you get one practical unlock and you can pick either one node or the other. This is just another potential dial, if you think you need it.
- How many points the player will have spent when fully maxed out. This is the high extreme of the system and should represent the peak of what the character can ever become.
- Whether things are completely locked until activated, or are improved by point spending. If you have zero points in Double-Jump, this may mean that it has a longer cooldown or that you don’t have access to it at all, for example.
- Which things are unlocked first and how you can use that to teach the player how to play. If you unlock the Super-Murder Smash, you will most likely want to play with it. This will teach it to you before you spend points upon reaching next level to unlock the Triple-Kill Ultra-Suplex. Etc.
- If you should be able to see all the options before you have access to them. Tree structures are good for this, since you can aim for some specific character build and then start “marching” through the nodes one unlock at a time.
- “Respeccing” needs to be considered. Some games will allow it for free, others may charge for it, and others again will require you to start a new character completely from scratch if you want to make different decisions.

Combining Multipliers
Multipliers are common. We like to double our critical hits, halve our fire damage, zero things we’re immune to, and so on. Mathematically, multipliers are fairly straightforward. Multiplying 4 by 6 gives you 24; 3 by 15 gives you 45, and so on. But game design tends to make things much more complicated.
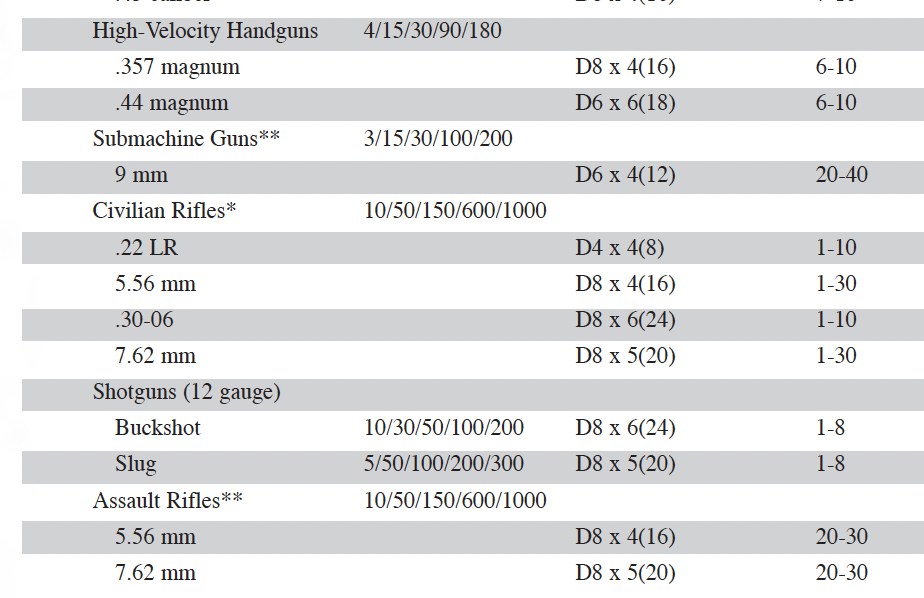
In the game All Flesh Must Be Eaten, multipliers are used to create a damage model that tries to give you an approximation of reality. You shoot a zombie by rolling D10 and adding one skill and one attribute. You must then hit a target number. Let’s say you roll high, and you score the system’s equivalent of a critical hit. Your shot was with a .44 magnum.
A .44 magnum deals D6 x 6 damage in the game. You roll the d6 and you score a 4, meaning 24 points of damage. But it doesn’t end there. You must now consider armor. Armor is deducted from the hit at this point, and the result after armor is doubled since this is a bullet wound.
Let’s say the zombie is wearing the Class II vest of the police officer it used to be. This will absorb D6 x 2. A 2 is rolled for the zombie, absorbing 4 points total. Now 20 points remain, which would be doubled to 40 points normally because it’s a bullet wound. But we rolled a critical remember? This means the multiplier is increased from 2 to 3, for a total of 60 points of damage.
This directly illustrates a couple of design considerations with multiplayers.
- Additive multipliers are stacked together. Like the critical hit effect in the previous example. The difference between turning a X*2 into a X*3 is very different from multiplicative multipliers.
- Multiplicative multipliers means multiplying several times, like the pseudocode previously. In such a case, each multiplier is applied individually, and the result will climb exponentially. It could be X*2*2.
- You can combine multiplicative and additive together as well, by separating additive multipliers into “buckets” and then multiplying those buckets with each other. For example, having one multiplier calculated from your character, another from your gear, and the third one from your opponent.
Combining Percentages
I’m not personally fond of small-scale percentage modifiers. Even if a +5% Sneak may sound interesting, the difference it makes is usually negligible. It easily becomes too trivial a choice to have an interesting impact and it gets hard to understand intuitively. But with games that rely heavily on gamification, this type of modifier is very common.
The one thing you need to consider with percentages is how they are added together. But overall, percentages are easier to work with than multipliers.

Using the Numbers
There are attributes and modifiers all around by now—let’s look into what you can use them for. This is probably the most obvious part of any gamified structure, but it’s easy to get lost in the weeds. It’s also easy to lose track of the balancing if you didn’t start from the highest possible extreme.
Some common ways to use numbers:
- Unlocks: Probably the most common way to use points in gamification is to unlock things. If you have ten points in Combat you get the triple-strike; if you reach Level 40 you get a mount.
- Container Values: Another very common restriction based on leveling up. How many things you can carry, how many times you can do a thing, how many units you can have, and so on. This is an area where you can often add considerable friction to a game. Either by restricting it and allowing players to pay for additional uses, or by having a game loop that assumes players circle back to some hub area or similar to “fill up.”
- Actions: Jump higher, run faster, slide longer, make quicker turns, brake faster; this is usually that +X%-style thing, but it can also represent the existence (or not) of a certain action. For example in a metroidvania dynamic. You have or you don’t have the unlocked super-jump boots.
- Combat: Deal more damage, absorb more damage, attack faster, etc. If you want to dive into this type of math, you need only look at any service-based first-person shooter. Like Destiny 2. Particularly after a few seasons of additions, the ways you can affect numbers in such a game climbs.
- Threshold Values: Many games, from Citizen Sleeper to Baldur’s Gate III, have plenty of dialogue that’s conditioned on specific variables. If you have the right dice roll in the first, or the right attribute value in the second, you are allowed to pick certain options. Games will treat this slightly differently. In Cyberpunk 2077, you can save your points and then allocate them at any point in a dialogue to sort of “spot-unlock” the dialogue responses you want to take.
- Comparisons: Some other numbers that climb, such as ratings values, kill counts, match counts, and the like, are not directly tied to gameplay but provide a good way to compare your own game performance to that of other players.
- Build Optimisation: If you mount gun X on your mech, it changes its performance from mounting gun Y. Learning the differences in such cases is very important. Optimising your build for things like endgame engagement can be a whole artform.

Beyond
There is a near infinite number of things you can do with numbers and the systems around numbers that are used in games today. These two pieces only scratch the surface. You can read Part 3: Loot if you want, but these still just scratch the surface.
But I wanted to touch on gamification from a simple implementation standpoint to demonstrate that it’s not very complex to implement and it can usually be kept decoupled from a game’s core logic using events and containers.
The question of whether you should use gamification is a much trickier one, and one I won’t engage with at all. As always in game development, you do you.

6 thoughts on “Gamification, Part 2: Implementation”